
Touch ID is an essential feature for many iPhone users, enabling them to unlock their devices, make payments, and perform various verifications with just a fingerprint. However, encountering the dreaded “Unable to Activate Touch ID on this iPhone” error can be incredibly frustrating. Fear not!
This comprehensive guide will walk you through the causes and solutions to get your Touch ID up and running in no time.

Common Causes Behind Touch ID Activation Failure
Before diving into the fixes, it’s crucial to understand the potential reasons behind the Touch ID activation error:
- Hardware Issues: The Touch ID sensor, housed within the iPhone’s Home button, may be damaged or defective. This could be due to physical damage from drops or general wear and tear.
- Software Glitches: Sometimes, bugs or glitches within the iOS system can lead to Touch ID activation failures, especially after a recent update or if system files become corrupted. These glitches may also cause other issues like iPhone call failed or iPhone 12 unable to activate.
- Environmental Factors: Believe it or not, your surroundings can also impact Touch ID performance. Moisture, dirt, and even cold weather can interfere with the sensor’s ability to accurately read your fingerprint.
The Ultimate Solution: Tenorshare ReiBoot
For most users, the Touch ID activation error stems from software-related issues rather than hardware problems. In such cases, the best solution is to employ a reliable iOS repair tool like Tenorshare ReiBoot.
Why Choose Tenorshare ReiBoot?
Tenorshare ReiBoot stands out among its competitors thanks to its:
- Advanced technology that resolves various iOS-related errors without data loss, including the 0x80070020 error
- User-friendly interface that guarantees positive results
- Compatibility with all iOS versions, including the latest iOS 17/18
- Ability to fix not only Touch ID issues but also more severe problems like iPhone stuck, black screen, and more
Step-by-Step Guide: Fixing “Unable to Activate Touch ID” with ReiBoot
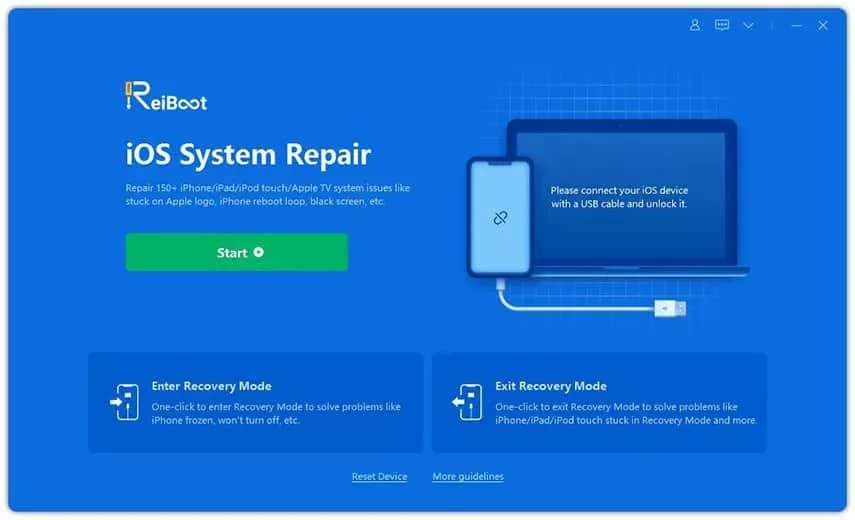
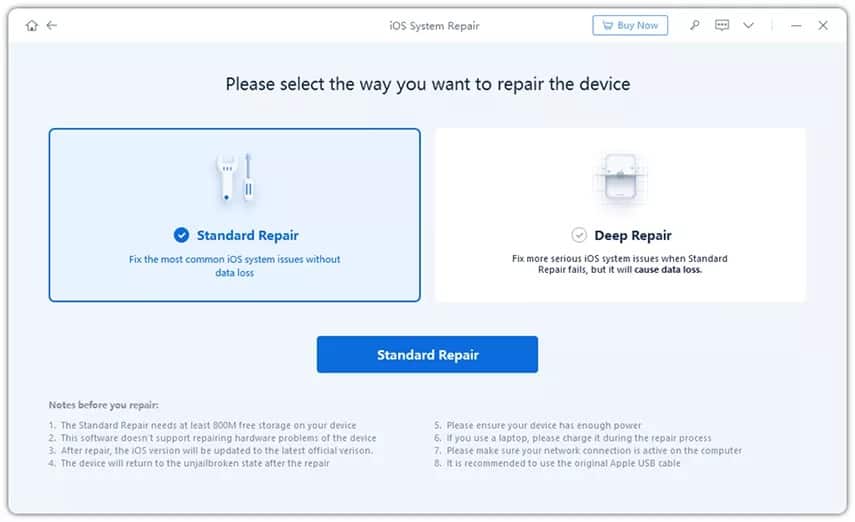
- Launch ReiBoot and Connect iPhone: Download and launch Tenorshare ReiBoot on your computer. Connect your iPhone to the computer and select “iOS System Repair” followed by “Standard Repair.”
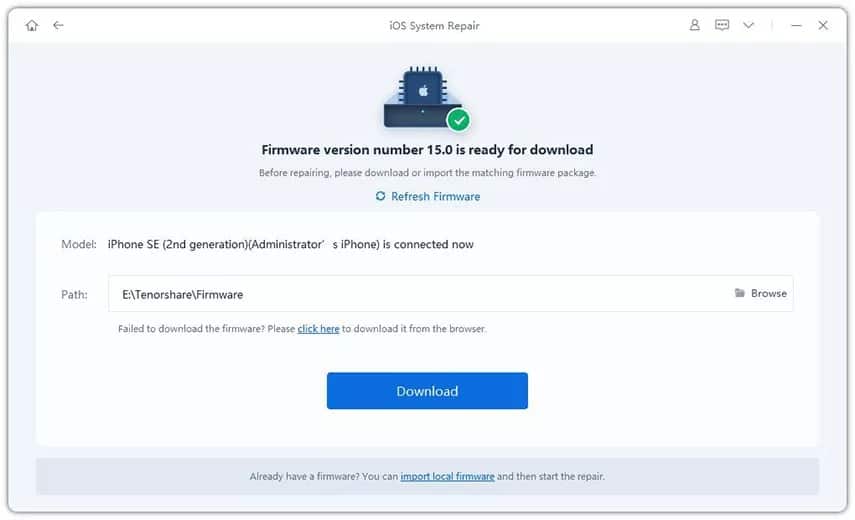
- Download Firmware Package: ReiBoot will provide a list of suitable firmware packages. Choose the most appropriate option and click “Download.”
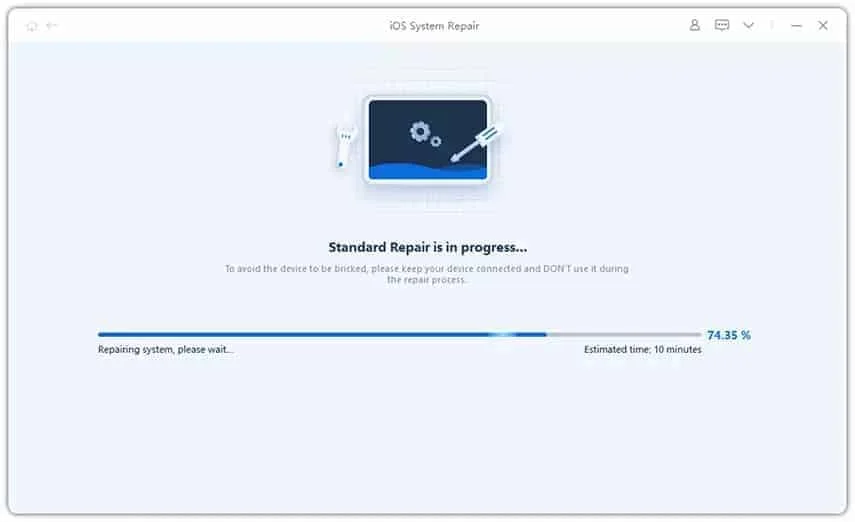
- Repair iOS System and Touch ID: Once the firmware package is downloaded, click “Start Standard Repair.” ReiBoot will now fix the iOS system and resolve the Touch ID activation error.

Alternative Troubleshooting Methods
While Tenorshare ReiBoot is the most effective solution, there are other methods you can try to resolve the “Unable to Activate Touch ID on this iPhone” error:
- Activating Touch ID in iPhone Settings: Go to “Settings” > “Touch ID & Passcode,” enter your password, and add a new fingerprint.
- Deleting and Resetting Touch ID: Navigate to “Settings” > “Touch ID & Passcode,” enter your password, and delete the existing fingerprints. Then, add a new fingerprint to reset Touch ID.
- Rebooting the iPhone: Press and hold the sleep/wake button and the Home button (iPhone 6s and earlier) or volume down button (iPhone 7 and later) until the Apple logo appears.
- Resetting All iPhone Settings: Go to “Settings” > “General” > “Reset” > “Reset All Settings.” This will not erase your data but will reset all settings to their defaults.
- Restoring iPhone to Factory Settings: You can do this either through “Settings” > “General” > “Reset” > “Erase All Content and Settings” or by using iTunes. Keep in mind that this will erase all data on your iPhone.
Dealing with MDM and Apple ID Issues
Sometimes, Touch ID activation may fail due to Mobile Device Management (MDM) profiles or issues with the linked Apple ID. If you encounter the “This iPhone is linked to an Apple ID” message or need to remove MDM without jailbreak, consider the following:
- Contact your MDM administrator to remove the profile
- Ensure you’re signed in with the correct Apple ID
- If you’ve forgotten your Apple ID password, reset it through the official Apple website
In case of a forgotten iPad passcode, you may need to bypass the iPad passcode using iTunes, iCloud, or recovery mode.
Frequently Asked Questions
- Can I still use my iPhone if Touch ID isn’t working? Yes, you can unlock your iPhone using your passcode. However, it’s recommended to fix the Touch ID issue for convenience and security.
- Is it safe to clean the Home button with alcohol? Avoid using alcohol or strong cleaning agents, as they may damage the Home button. Instead, use a slightly damp, lint-free cloth to gently clean it.
- Can a third-party repair shop fix my Touch ID issue? While third-party repair shops may be able to help, it’s always best to visit an Apple Store or authorized service center to ensure your iPhone is handled by certified technicians.
- Will a screen protector interfere with Touch ID? A high-quality screen protector should not interfere with Touch ID if installed correctly and not covering the Home button.
- What if my Touch ID issue is caused by water damage? If you suspect water damage, turn off your iPhone immediately and let it dry for at least 48 hours. If the issue persists, seek professional assistance from Apple or an authorized service center.
Conclusion
The “Unable to Activate Touch ID on this iPhone” error can be a real headache, but with the right knowledge and tools, you can overcome this obstacle. Tenorshare ReiBoot offers the most comprehensive and user-friendly solution to fix Touch ID activation issues without data loss. By understanding the common causes and exploring alternative troubleshooting methods, you’ll be well-equipped to tackle this problem head-on.
Remember to keep your iPhone well-maintained, updated, and backed up regularly to minimize the chances of encountering such issues in the future. If you experience other problems like a “Your connection is not private” error, be sure to follow the appropriate troubleshooting steps. If all else fails, don’t hesitate to seek professional help from Apple or authorized service providers. With these tips and tricks up your sleeve, you’re on your way to a seamless and secure iPhone experience!


