
Are you frustrated with your AirPods sounding muffled or distorted? Don’t worry; you’re not alone. Many AirPods users have encountered this issue at some point. Muffled sound can significantly impact your listening experience, making your favorite music or podcasts sound dull and lackluster.
Fortunately, there are several effective solutions to restore the crystal-clear audio quality of your AirPods. In this comprehensive guide, we’ll delve into the common causes of muffled sound and provide you with a step-by-step approach to fixing the problem.
Common Causes of Muffled Sound in AirPods
Before we jump into the solutions, let’s explore the potential reasons behind the muffled sound in your AirPods:
1. Dirt, Earwax, and Debris Accumulation
One of the most common culprits of muffled sound is the buildup of dirt, earwax, and debris in the AirPods. Over time, these substances can accumulate in the ear tips and speaker grilles, obstructing the sound and reducing clarity. The small openings in the AirPods are particularly prone to this issue.
2. Connectivity and Bluetooth Issues
Muffled sound can also stem from connectivity problems. Interference from other Bluetooth devices or a weak signal between your AirPods and the paired device can lead to distorted or muffled audio.
Additionally, outdated Bluetooth drivers or firmware can contribute to the problem. If your AirPods are connected but the sound is coming from your phone, it could indicate a connectivity issue.
3. Hardware Malfunctions
In some cases, hardware malfunctions may be responsible for the muffled sound. Manufacturing defects, damage from accidental drops, or exposure to water can affect the internal components of the AirPods, resulting in audio issues. If one AirPod dies faster or one AirPod is louder than the other, it could indicate a hardware problem.
4. Improper Fit and Seal in the Ear
A proper fit and seal are crucial for optimal sound quality. If your AirPods don’t fit snugly in your ears or create an insufficient seal, the sound may become muffled or lacking in bass. Using the wrong ear tip size, incorrectly positioning the AirPods, or not wearing AirPods Pro properly can exacerbate this problem.
5. Incorrect Audio and Equalizer Settings
Believe it or not, your audio settings can also contribute to muffled sound. Noise cancellation features, when enabled, may alter the audio quality. Additionally, equalizer (EQ) presets that are not optimized for AirPods can make the sound appear dull or muffled.
Step-by-Step Guide to Fixing Muffled AirPods Sound
Now that we’ve identified the potential causes let’s dive into the solutions. Follow these steps to troubleshoot and fix the muffled sound in your AirPods:
Step 1: Inspect and Clean the AirPods
Start by thoroughly inspecting your AirPods for any visible dirt, earwax, or debris. Use a soft-bristled brush, such as a toothbrush, to gently clean the ear tips and speaker grilles. Be cautious not to push the debris further into the openings.
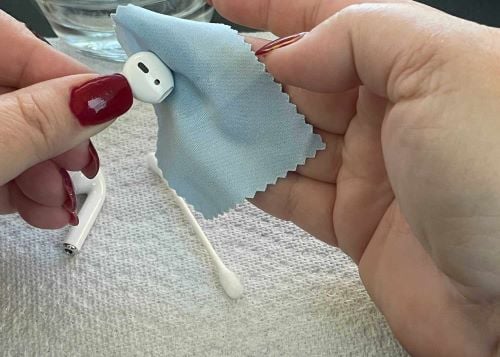
For stubborn buildup, slightly dampen a cloth with water and wipe the surfaces. Ensure the AirPods are completely dry before using them again.
Step 2: Ensure Proper Fit and Seal
Experiment with different ear tip sizes to find the one that provides the best fit and seal for your ears. Apple offers multiple ear tip options, so don’t hesitate to try them out.
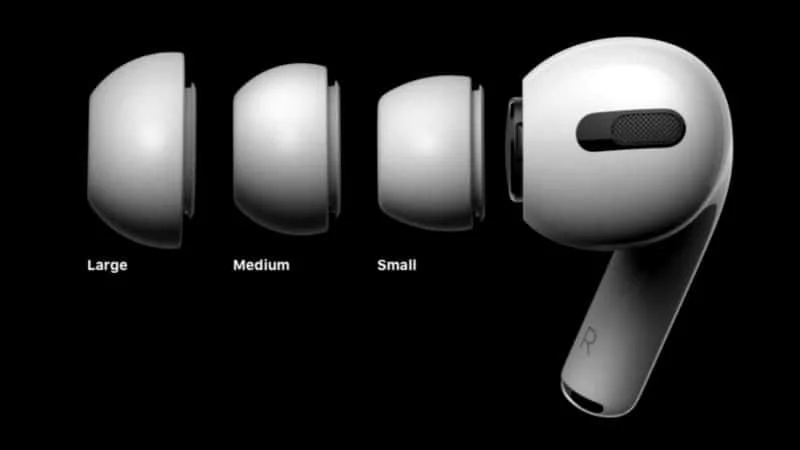
Adjust the placement of the AirPods in your ears, ensuring they are snugly positioned and creating a proper seal. A secure fit will enhance sound quality and prevent muffled audio. If you have AirPods Pro, make sure you are wearing them correctly for optimal performance.
Step 3: Troubleshoot Bluetooth Connectivity
If the muffled sound persists, try troubleshooting the Bluetooth connection. Start by forgetting the AirPods from your device’s Bluetooth settings and then re-pairing them. This process can help resolve any connectivity glitches.

Additionally, reset the Bluetooth settings on your device, which can clear any temporary issues. Make sure your device’s operating system (iOS) or firmware is up to date, as outdated software can sometimes cause audio problems.
Step 4: Adjust Audio Settings
Take a moment to review your audio settings. If noise cancellation is enabled, try disabling it to see if it improves the sound quality. Muffled sound can occasionally occur when noise cancellation is active. Moreover, check your EQ settings.
If you’re using a preset that doesn’t complement the AirPods, switch to the “Off” or “Flat” setting for a more balanced sound. Lastly, ensure that any volume limit settings are not restricting the audio output.
Step 5: Update and Reset the AirPods
If the issue persists, check for any available firmware updates for your AirPods. Apple occasionally releases updates that address audio quality and performance improvements.
To update your AirPods, connect them to your device, place them in the charging case, and keep the case open near your device. The update should install automatically.
If updating doesn’t resolve the muffled sound, consider resetting your AirPods to their factory settings. To do this, press and hold the setup button on the back of the charging case for at least 15 seconds until the status light flashes amber and then white.
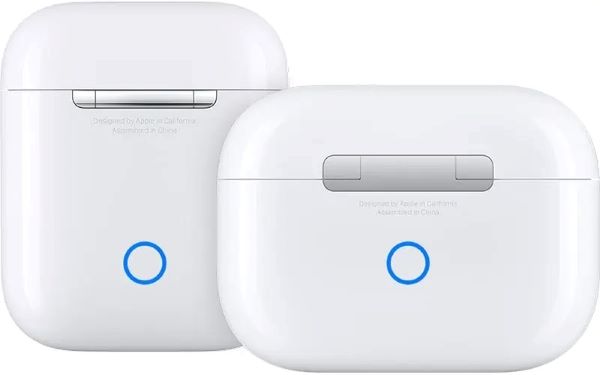
After resetting, re-pair your AirPods with your device and test the audio quality. If your AirPods won’t flash white during the reset process, try charging them fully and then attempting the reset again.

Step 6: Contact Apple Support
If none of the above steps alleviate the muffled sound issue, it may be time to contact Apple Support. There could be an underlying hardware problem that requires professional assistance.
Apple offers repair and replacement services for AirPods, so don’t hesitate to reach out to them. They can diagnose the issue and provide the necessary support to restore your AirPods’ audio quality.
Preventive Measures for Optimal AirPods Sound Quality
To maintain the best possible sound quality from your AirPods, consider implementing these preventive measures:
- Regular Cleaning and Maintenance: Establish a routine to clean your AirPods regularly. Remove any visible dirt, earwax, or debris to prevent buildup that can affect sound quality. Use a soft-bristled brush or a slightly damp cloth for cleaning.
- Proper Storage and Charging: Always store your AirPods in their charging case when not in use. The case protects them from dust, dirt, and potential damage. Avoid exposing the AirPods to extreme temperatures or direct sunlight for extended periods. If your AirPods case is not charging, try cleaning the charging ports and ensuring the case and AirPods are properly seated.
- Avoid Moisture and Water Exposure: Although AirPods are water-resistant, they are not waterproof. Refrain from using them in heavy rain, while swimming, or in situations where they may be submerged in water. If your AirPods do get wet, dry them thoroughly with a soft, lint-free cloth before placing them back in the charging case.
- Handle with Care: Treat your AirPods with care to prevent accidental drops or damage. When removing them from your ears, hold them securely to avoid dropping them on hard surfaces. Consider using a protective case or skin to provide an extra layer of protection.
- Proper Naming and Organization: Rename your AirPods with a clear and identifiable name to avoid confusion with other devices. This can be especially helpful if you own multiple pairs of AirPods or if you frequently connect to different devices. Keeping your AirPods organized and easily identifiable can prevent mix-ups and ensure a seamless listening experience.
Frequently Asked Questions
- How often should I clean my AirPods to prevent muffled sound? It’s recommended to clean your AirPods at least once every few weeks or whenever you notice a decrease in sound quality. Regular cleaning helps prevent the buildup of dirt and earwax that can cause muffled audio.
- Can using third-party ear tips affect the sound quality of AirPods? While third-party ear tips can provide a better fit for some users, they may not always guarantee the same sound quality as the original Apple ear tips. It’s best to use the ear tips designed specifically for your AirPods model to ensure optimal audio performance.
- What should I do if one AirPod sounds more muffled than the other? If you experience a noticeable difference in sound quality between the left and right AirPods, try cleaning both of them thoroughly. Ensure that the speaker grilles and ear tips are free from obstruction. If one AirPod is significantly louder than the other, there might be a hardware problem, and you should contact Apple Support for further assistance.
- Can the muffled sound be a sign of a more serious hardware issue? In some cases, muffled sound can indicate a hardware malfunction, such as a damaged speaker or a faulty component. If cleaning, adjusting settings, and resetting your AirPods don’t resolve the issue, it’s advisable to have them checked by Apple Support or an authorized service provider.
- How do I properly wear AirPods Pro for the best sound quality? To wear AirPods Pro correctly, gently insert them into your ears with the ear tips facing upward and the stems pointing down. Rotate the AirPods until they fit comfortably and securely in your ear canals. The ear tips should create a seal to provide optimal noise isolation and sound quality. Experiment with different ear tip sizes to find the best fit for your ears.
Conclusion
Dealing with muffled sound in your AirPods can be frustrating, but with the right troubleshooting steps, you can often restore their audio quality. By understanding the common causes and following the step-by-step guide provided in this article, you’ll be well-equipped to tackle the issue head-on.
Remember, prevention is key to maintaining optimal sound quality. Regular cleaning, proper storage and charging, avoiding moisture, handling your AirPods with care, and keeping them properly named and organized can go a long way in preventing muffled sound and other audio problems.
If you’ve tried all the solutions and still experience muffled sound, don’t hesitate to contact Apple Support. They have the expertise and resources to diagnose and resolve any underlying hardware issues.
With a proactive approach and the knowledge shared in this guide, you can once again enjoy the crisp, clear audio that your AirPods are designed to deliver. Happy listening!


