Are you facing the issue of ‘your computer is low on memory’ on your Windows 7/10/8 OS? You must have seen your computer displaying this dialog whenever you try to open files or run some program.
To avoid this, read this article to expand the space on your computer or to create more virtual memory.
Three answers to ‘your computer is low on memory’ for your Windows 7/10/8 OS are as follows:
Know the basics of memory:
The message regarding ‘your computer is low on memory’ might be displayed in different ways depending on Windows 7 or Windows 10, but they mean the same. It means that you have low RAM on your computer as well as low virtual memory.
This is not synonymous with space on your disk or hard drive. We will tell you about three methods to fix this issue. If the initial two do not work, then you have to use the third one to enhance your RAM.
Besides, if you have problems with USB devices not being recognized, click to fix them now.
1: Delete the Program That Takes Up Too Much Space
Some programs use a lot of space, and you get a low memory message. If you have a Windows OS that has an issue with RAM and CPU storage, then you can follow these steps to fix the ‘your computer is low on memory’ error:

1. Select Ctrl + Alt + Del that will show a menu, from which you have to click on Task Manager.
2. You can easily see the process that is taking up the maximum memory in the Process tab. Right-click on the process that is taking up the most space and select the option of End task.
And here are the answers to the below errors for you: Windows Cannot Access the Specified Device Path or File, SD card not showing up, and the system cannot find the file specified.
2: Expand the Virtual Memory
The first answer might give you a short-term solution for ‘your computer is low on memory.’ In that case, the expansion of the memory that is virtual might prove to be a solution for a longer period.
Here are the steps to do that:
1. Select Windows key + R, and you will get a dialog box. You have to type sysdm.cpl in that box and press OK to open System Properties.
2. Click on the option of Advanced system settings.

3. Under the Advanced option, you will see an option of Settings. Click on that.

4. The Advanced pane will be opened, where you have to select the Change option.

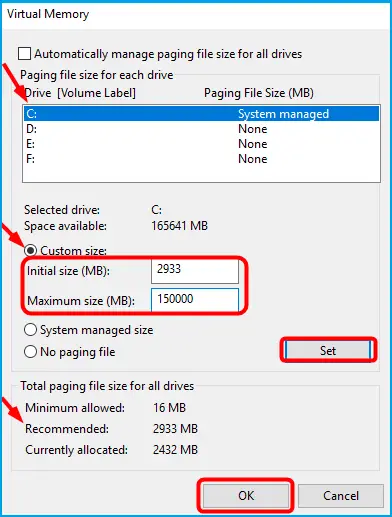
5. There will be an option to manage paging file size for all drives Automatically. Uncheck that.
6. Choose the Custom size option and then put the Initial size and Maximum size according to your convenience. Remember to put sizes more than the ones that are suggested.

7. Choose Set and then OK.
Besides, here, you will learn more about Why is NisSrv.exe always running. For the Windows update error 0x80070020, here are the top solutions for you.
3: Enhance RAM without Restoring Your Windows
Of all the answers we have discussed so far, this final one is the most effective when solving the ‘your computer is low on memory issue.’
This is even more so when your PC repeatedly displays that message, and then you know that it is high time that you changed your RAM.
RAM, as we know, is a chief part of your computer’s hardware. All the installations that you have on your Windows will be wiped out when you reinstall RAM.
It is, therefore, better if you learn the way to update your RAM without having to reinstall your Windows all over again. This is where EaseUS Todo Backup comes in handy.
The first step is to build a backup of your whole system before you replace your RAM. Here’s how to do this:
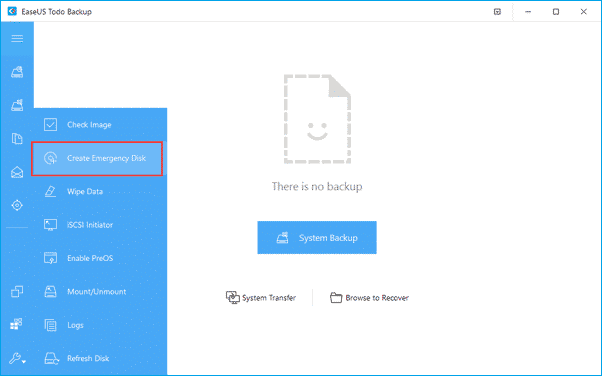
1. Firstly, you have to plug in the USB, preferably 16GB, to your computer and then open EaseUS Todo Backup. Press the Tools button and then press ‘Create Emergency Disk.’

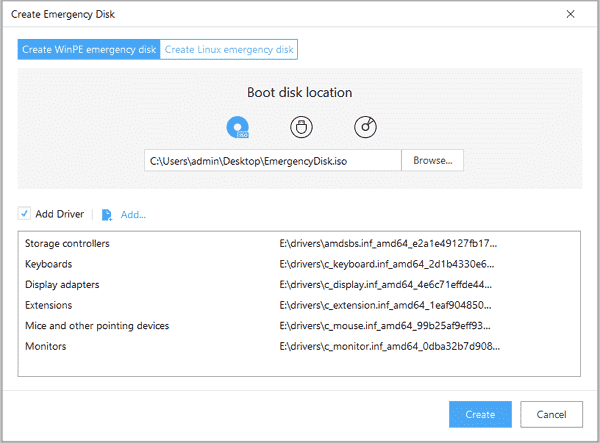
2. Under the Boot disk type, you will see an option that reads ‘Create WinPE emergency disk.’ Press that option.

3. In order to create a disk that you can boot, you have to press the Proceed option then.
4. After you have created the EaseUS Todo bootable disk, you have to return to the central window and select the option of System backup.

5. You need to select the recently created USB drive that can be booted as your location for backup. Then, you have to press the ‘Proceed‘ button to initiate the backup procedure.

When the process is done, you will get a USB drive that can be booted with a system image on that. You are now ready to begin upgrading the RAM of your computer.
Now that you are done with the backup, you must transfer your system from your computer to the new hardware. This will be done after replacing the RAM. We have outlined the process here:
1. Go to the EaseUS Todo Backup bootable USB flash drive and boot your computer from there.
2. You will see an option of ‘System Transfer‘ on the central window of EaseUS Todo Backup. Click on that button.

3. Press the option of ‘System Backup‘ present on the flash drive of the USB and then press OK.

4. The new hardware is your destination of recovery. Choose that to restore your system, and then press the ‘Proceed‘ button.

And you have completed the process! You can easily upgrade your RAM now to avoid getting the ‘your computer is low on memory’ message. You do not even have to reinstall your Windows OS to get going.
Also, click here to learn more about the Vulkan Run Time Libraries.
Features of EaseUS Todo Backup
Since we have informed you about how to use EaseUS Todo Backup, you should be aware of the features as well. So, here you go:
- 1. The EaseUS Todo Backup is designed in such a smart way that you can choose to back up your whole system or back up particular files or folders. This means that, be it an image-level backup or a file-level one, this tool gives you all.
- 2. The tool comes at a very affordable price, and the user interface is designed to make you feel comfortable.
- 3. Any virus or malware cannot easily infest this tool because of its strongly protected software. In this way, you get to keep all your important data safe as well.
- 4. If you want to back up certain partitions from a drive, then you can use the SSD and HDD backups that EaseUS block-level imaging software manufactures.
- 5. We often back up our files on cloud storage facilities like Google Drive, OneDrive, Dropbox, etc. The EaseUS backup device will help you backup files to all the aforementioned services.
- 6. EaseUS Todo Backup also comes with features needed to protect your data on your computer.
- 7. If you have a busy schedule, the EaseUS Todo Backup has got all your backup updates covered for you. You can create a backup process and customize it according to a specific period or some particular event. The process can be supervised on live timing, regular reports of the backup process, and notifications on your email.
- 8. At times, your operating system might not work properly and might refuse to start. In that case, you could always use the Todo Backup that you will find under the boot menu. This will let you start the Pre-OS process, which will let you retrieve your system.
- 9. This tool lets you easily handle all the backup work that needs to be done. Any outdated images of backup that your computer might have will take up unnecessary space. This will clog your storage and show the message, ‘your computer is low on memory.’ With the EaseUS tool, you can delete such unwanted images automatically to free up your memory.
- 10. Using EaseUS will protect you from losing your valuable data through a malware attack, crashing of the system, deleting data by accident, some technical error, etc.
- 11. The cloning utility of EaseUS Todo Backup is quite quick and can be manipulated accordingly. It is the best software when you want to produce a clone of Windows XP/10/7/8/8.1/Vista. It will let you easily transfer from OS to HDD or SSD.
These were the most important features of the EaseUS Todo Backup tool out of many other features that it comes with.
Now, you know the use of this tool, and you know the exact procedure of using it for backup. The process is hassle-free and safe. So, get it today!
4: Remove Temporary Files
Temporary files can accumulate over time and occupy a significant amount of disk space. Deleting them can help alleviate the low memory issue. Here’s how:
- Press Win + R to open the Run dialog box.
- Type “%temp%” and press Enter.
- This opens the Temporary folder. Select all files and delete them.
5: Disable Superfetch and Prefetch
Disabling Superfetch and Prefetch can prevent excessive memory usage. Follow these steps:
- Press Win + R to open the Run dialog box.
- Type “services.msc” and press Enter to open the Services window.
- Scroll down and locate “Superfetch” and “Prefetch.”
- Double-click on each of them to open their properties.
- In the properties window, select “Disabled” under the Startup type.
- Click on “Apply” and then “OK” to save the changes.
6: Adjust System Settings for Best Performance
Fine-tuning system settings for the best performance can help optimize memory usage. Here’s how:
- Press Win + R to open the Run dialog box.
- Type “sysdm.cpl” and press Enter to open the System Properties window.
- In the System Properties window, click on the “Advanced” tab.
- Under the Performance section, click on “Settings.”
- In the Performance Options window, select the “Adjust for best performance” option.
- Click “Apply” and then “OK” to save the changes.
7: Optimize Windows Visual Effects
Adjusting Windows visual effects settings can help free up memory. Follow these steps:
- Press Win + R to open the Run dialog box.
- Type “sysdm.cpl” and press Enter to open the System Properties window.
- In the System Properties window, click on the “Advanced” tab.
- Under the Performance section, click on “Settings.”
- In the Performance Options window, select the “Adjust for best performance” option or customize the settings according to your preference.
- Click “Apply” and then “OK” to save the changes.
8: Update Device Drivers
Outdated or faulty device drivers can cause memory-related issues. To update your drivers, follow these steps:
- Press Win + X and select “Device Manager” from the menu.
- In the Device Manager window, expand the categories and locate the device drivers.
- Right-click on a driver and select “Update driver.”
- Choose the option to search for updated drivers automatically.
- Repeat the process for other drivers.
Conclusion
Encountering the ‘Your Computer is Low on Memory’ issue can be frustrating, but by following the solutions outlined in this article, you can effectively address the problem.
Remember to close unnecessary programs, increase virtual memory, disable startup programs, perform a disk cleanup, upgrade your RAM, scan for malware, optimize Windows visual effects, update device drivers, remove temporary files, disable Superfetch and Prefetch, and adjust system settings for the best performance.
These steps will help optimize your computer’s memory usage and improve its overall performance.
Frequently Asked Questions (FAQs)
Q1. How can I check the amount of available memory on my computer?
To check the available memory on your computer, follow these steps:
- On Windows 7: Right-click on the taskbar and select “Task Manager.” In the Performance tab, check the “Physical Memory” section.
- On Windows 8/10: Press Ctrl + Shift + Esc to open the Task Manager. In the Performance tab, check the “Memory” section.
Q2. Can I fix the low memory issue by restarting my computer?
Restarting your computer can temporarily alleviate the low memory issue by clearing the memory cache. However, it may not be a permanent solution if the underlying cause persists.
Q3. Should I disable all startup programs?
No, you should only disable unnecessary startup programs that you don’t need running every time your computer starts. Disabling essential programs may affect the functionality of certain applications.
Q4. How do I know if I need to upgrade my RAM?
If your computer frequently runs out of memory or becomes sluggish when running multiple programs, it may be a sign that you need to upgrade your RAM.
Q5. Is it safe to disable Superfetch and Prefetch?
Disabling Superfetch and Prefetch can be safe and may help in some cases, but it depends on your specific system configuration. You can try disabling them and monitor the performance of your computer. If you experience any negative effects, you can re-enable them.


