In today’s digital age, privacy and system optimization are paramount concerns for Windows users. One often overlooked aspect of maintaining your PC’s privacy and performance is managing your Recent Files list.
This guide will walk you through various methods to clear Recent Files in Windows 10, ensuring your system remains clean, efficient, and secure.
Introduction: Understanding Recent Files in Windows 10
Recent Files in Windows 10 is a feature designed to enhance user productivity by providing quick access to frequently used documents and folders. While convenient, this feature can also pose privacy risks and potentially clutter your system.
Why Clear Recent Files?
- Privacy: Prevents others from viewing your recently accessed files
- Performance: Can improve system responsiveness by reducing cached data
- Organization: Keeps your File Explorer clean and easier to navigate
If you’re experiencing slowdowns, clearing recent files might help. For more comprehensive solutions to a slow Windows 10 system, check out our guide on troubleshooting Windows 10 performance issues.
Locating Recent Files in Windows 10
Before we dive into clearing methods, it’s essential to know where Recent Files are stored:
- Quick Access Panel: Found in File Explorer, displaying recently used files and folders
- Jump Lists: Right-click on taskbar icons to see app-specific recent items
Methods to Clear Recent Files
Using File Explorer

- Open File Explorer (Windows key + E)
- Click on “View” in the top menu
- Select “Options” on the right side
- In the Privacy section, click “Clear“
This method is quick and straightforward, ideal for occasional cleaning.
Using Windows 10 Settings

- Open Settings (Windows key + I)
- Navigate to Personalization > Start
- Toggle off “Show recently opened items in Jump Lists on Start or the taskbar“
This approach prevents recent items from appearing in Jump Lists.
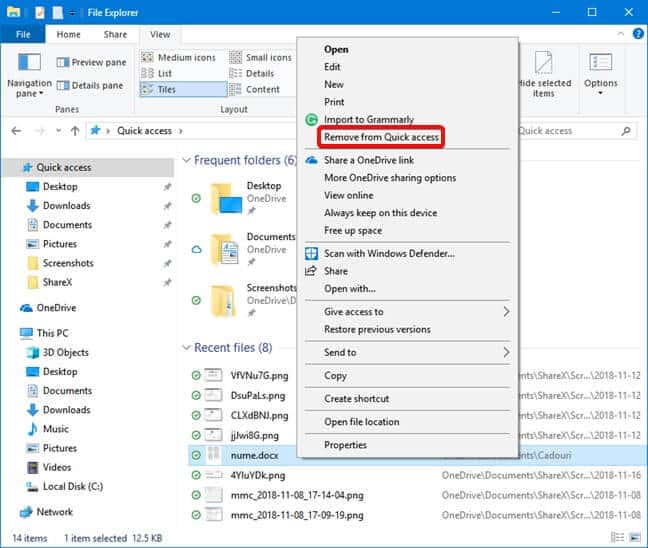
Clearing Individual Items
For selective cleaning:

- Open File Explorer
- Go to Quick Access
- Right-click on an item
- Select “Remove from Quick access“
Using Run Command
For a more thorough cleanup:
- Press Windows key + R
- Type
%AppData%\Microsoft\Windows\Recentand press Enter - Delete all files in the opened folder
This method removes all traces of recent files from your system.
Using Group Policy Editor (Pro and Enterprise editions only)

- Press Windows key + R, type
gpedit.msc, and press Enter - Navigate to User Configuration > Administrative Templates > Start Menu and Taskbar
- Double-click “Clear history of recently opened documents on exit“
- Select “Enabled” and click OK
This setting automatically clears recent documents when you exit Windows.
Using Registry Editor (Advanced users)

- Press Windows key + R, type
regedit, and press Enter - Navigate to
HKEY_CURRENT_USER\Software\Microsoft\Windows\CurrentVersion\Explorer\Advanced - Right-click, select New > DWORD (32-bit) Value
- Name it “Start_TrackDocs“
- Set its value to 0
This registry tweak disables the tracking of recent documents.
Preventing Future Recent Files
To stop Windows from creating Recent Files:
- Open File Explorer
- Click View > Options
- Under Privacy, uncheck “Show recently used files in Quick access“
Advanced Techniques
Using Third-Party Tools
For more control, consider using reputable cleaning tools like CCleaner or BleachBit. These applications offer comprehensive system cleaning, including Recent Files management.
Automating the Process
Create a batch file or scheduled task to clear Recent Files automatically:
- Open Notepad
- Paste this code:
del /q /f %APPDATA%\Microsoft\Windows\Recent\*.* - Save as
ClearRecentFiles.bat - Schedule this batch file to run periodically using Task Scheduler
Benefits of Clearing Recent Files
- Enhanced privacy on shared computers
- Improved system performance
- Better organization of your workspace
- Reduced risk of sensitive information exposure
For Mac users, similar benefits can be achieved by clearing cache and managing downloads.
Best Practices for Managing Recent Files
- Regularly clear Recent Files, especially on shared devices
- Use private browsing modes when accessing sensitive documents
- Consider disabling the Recent Files feature if privacy is a top concern
- Educate other users about the importance of clearing Recent Files
To further enhance your privacy, you might want to hide the Recycle Bin on your desktop.
Troubleshooting Common Issues
- If Recent Files keep reappearing, check for malware or conflicting applications
- Ensure you have the necessary permissions to modify system settings
- Restart your computer after making changes to ensure they take effect
If you encounter more serious issues like an Unmountable Boot Volume error, you may need to take additional steps to repair your system.
FAQ Section
Q: Does clearing Recent Files delete the actual files? A: No, it only removes shortcuts to these files from the Recent Files list.
Q: How often should I clear Recent Files? A: It depends on your usage, but monthly cleaning is a good practice for most users.
Q: Will clearing Recent Files improve my computer’s speed? A: It may slightly improve performance, especially if you have a large number of recent items.
Q: Can I recover cleared Recent Files? A: The actual files remain untouched, but the Recent Files list cannot be recovered once cleared.
Q: Is it safe to edit the Registry to manage Recent Files? A: While effective, editing the Registry can be risky. Always backup your Registry before making changes.
Conclusion
Managing Recent Files in Windows 10 is a crucial aspect of maintaining your system’s privacy and efficiency. By following the methods outlined in this guide, you can ensure that your Recent Files list remains under your control. Remember, regular maintenance and awareness of your system’s features are key to a secure and optimized Windows experience.
Whether you choose to manually clear Recent Files, use built-in Windows tools, or opt for advanced automated solutions, the power to control your digital footprint is in your hands. Stay vigilant, keep your system clean, and enjoy a more private and efficient Windows 10 experience.
For those interested in documenting their Windows 10 experience or creating tutorials, learning how to record your screen in Windows 10 can be incredibly useful.


