
Snapchat has revolutionized the way we communicate and share moments with others. With its user-friendly interface and unique features, it has gained immense popularity across different age groups. However, encountering errors while using Snapchat can be frustrating, and the “There Was a Problem Connecting to The Server” error is one such issue that users may face. Let’s delve deeper into understanding this error and explore ways to resolve it.
Understanding the “There Was a Problem Connecting to The Server” Error
The “There Was a Problem Connecting to The Server” error is a common occurrence on Snapchat. When this error message appears, it indicates that the app is unable to establish a connection with Snapchat’s servers. Consequently, you may experience issues while sending or receiving snaps, viewing stories, or accessing any of the app’s features.
Possible Causes of the Error
Several factors can contribute to the “There Was a Problem Connecting to The Server” error on Snapchat. Here are some potential causes:
- Network Connection Issues: Poor internet connectivity or unstable network signals can prevent Snapchat from establishing a connection with its servers.
- Server Maintenance or Outages: Snapchat occasionally undergoes server maintenance or may experience temporary outages, which can result in connectivity problems.
- App Version Incompatibility: If you are using an outdated version of Snapchat, it may not be compatible with the servers, leading to connection issues.
- Cache Build-up: Accumulated cache data within the app can sometimes interfere with the connection, causing the error message to appear.
No matter whether you use an iOS device or an Android, let’s see how to fix this issue easily.
Solving “Snapchat there was a problem connecting to the server” issue – iOS
In this part of our article, we explain how to fix the “Snapchat could not connect” issue on iOS devices.
If you are an Android user, you can jump into the next part straight away. This section comprises multiple methods to address the aforesaid issue.
01. Check if the network is fine
As you already know, Snapchat is a social media app that works on the internet. So, the very first thing you should do is to check if your internet connection is working fine.
- Go to the “Settings” app and select the option labeled “WLAN.”
- Then, you should either switch to another Wi-Fi network or simply use cellular data.
Once you have connected to a stable and speedy network, you can just launch the Snapchat app. If it doesn’t work, the problem is not with the network. In that case, you will have to try other fixes mentioned below in our article.
Also, if you have a problem with the iOS Cannot Get Mail – The Connection To The Server Failed, click to fix it now.
02. See if the app is crashed
For many users, some errors have taken place due to a crash on the Snapchat app itself. In this case, you will have to check with their official sources.
For instance, you can check their official Twitter page (@Snapchatsupports) and see if they talk about any issues.
If not, you can simply check it through Down Detector. As you may know, Down Detector is an online tool (website) that checks if a website is down.
03. Close and restart Snapchat
Sometimes, the ‘Snapchat could not connect to the server’ problem might be a temporary one due to a small glitch associated with the app itself. In this case, you can easily solve it by closing and restarting the Snapchat app.
In fact, force closing and restarting the app can solve various minor issues of any app. Mentioned below are the steps to be taken to close and restart the Snapchat app.
- First of all, double-tap the Home button.
- You will see the apps now. Just swipe to find the app you intend to close (in this case, it is Snapchat). Then, swipe the respective app (Snapchat) to force close it.
- Wait for a while and then reopen the app to see if it works now.
04. Exit VPN on the iOS device
Many individuals use VPNs on their iOS devices due to various reasons. Well, what if you are currently using a VPN on your device and you experience some issues with Snapchat? The solution is to close the VPN and try logging in to Snapchat once again.
In other words, what we recommend is to try using Snapchat without VPN. That is because some of the VPNs may affect the process due to stability issues.
In addition, if you’ve ever wondered how to “added by phone number on Snapchat,” keep reading for step-by-step instructions and other ways to find friends on Snapchat!
05. Enable Snapchat to access cellular and Wi-Fi data

Whenever you have downloaded and installed a new app, it requires special permissions, and so does Snapchat. When you install Snapchat, you will see that it asks for permission to use Wi-Fi and cellular data.
If you didn’t grant the required permission, Snapchat would not be able to use internet access. In this case, it will not be able to sign in for Snapchat. So, it will not be a surprise to see Snapchat could not connect messages.
Mentioned below are the steps you should consider in order to fix this in an iPhone.
- Go to Settings and select the option labeled Snapchat.
- Then, go to the option called “Wireless Data.”
- Now, select the option called WLAN & Cellular Data so you can allow Snapchat to use data.
06. Perform a reboot on your device
Performing a force restart or a reboot on your iOS device will address the majority of minor glitches. That is why most iPhone users tend to perform a restart whenever they experience issues. These issues can range from app-related issues to iOS-related lags.
Well, this trick may sound pretty silly to some individuals. However, the truth is that it can be very effective at times.
Also, restarting your iOS device doesn’t require much effort or consume a substantial amount of time. So, as we believe, it is worth giving this option a shot and seeing if it works for you.
Mentioned below are the steps you should follow in order to reboot your iOS device easily.
For iPhone X or newer;
- Press and hold the Side button with any of the volume buttons to see the power-off slider.
- Once the power slider appears, just drag it and turn the device off.
- Once the device is turned off, you should press and hold the Side button once again.
- You will now see the Apple logo.
For iPhone 8 or older;
- Press and hold the Top/Side button depending on the type of the device so you can see the power slider.
- Drag the slider and turn the iOS device off.
- Once the device is turned off, press and hold the Top/Side button to see the Apple logo.
07. Update the Snapchat app
If you are not yet succeeded after all those steps, you should try updating your Snapchat app. By doing so, you will be able to fix potential bugs and errors associated with the current app version, including ‘Snapchat There Was a Problem Connecting to The Server‘.
As you might realize, apps generally offer timely updates to fix issues, introduce new features, and secure the app. The same is true with Snapchat as well. In this case, it is a wise and effective approach to update the respective app.
For many individuals, the updates have actually worked and fixed the potential issues associated with Snapchat.
With that said, it is totally worth giving it a try to see if the update fixes your issue.
08. Delete the Snapchat app and reinstall it
If the problem is persisting, you can try deleting and reinstalling the Snapchat app to fix it. To do this, you should simply tap and hold a Snapchat icon.
Then, you will see a cross icon at the top left-hand corner. Tap it to delete (uninstall) Snapchat.
Go to the App Store once again and download the Snapchat app back. The app should work fine now for most of the users.
09. Get rid of the jailbreak tweaks that are incompatible with your iOS device

Some iOS users have jailbroken devices. These devices come with various tweaks that may be incompatible with the original iOS system. These tweaks can necessarily create negative impacts on the system.
As a result, some of the apps might crash or malfunction. So, if you have a jailbroken device and the Snapchat app gives some problems with it, remove the tweaks.
To get rid of these tweaks, you should necessarily follow the steps mentioned below.
- First, you should download Cydia. For those who don’t know what Cydia is, it is managed for the iOS system. This tool allows you to install various jailbroken apps on your iOS device (iPhone, iPods, and iPads).
- Now, you should launch Cydia and then search for the potentially troublesome tweaks. Namely, you should find ‘xcon’ or ‘nosub’ within the search bar of Cydia.
- Now, you should tap on the xCon or NoSub for the apps installed. For instance, you will have to tap on ‘xCon for Fortnite.’
- You should then go to the option “Modify” and select “Remove” to get rid of it.
That’s it. You can now see if your Snapchat app works fine.
10. Get in touch with Snapchat Support

If you are yet to succeed, you will have no other option than to get in touch with Snapchat Support. Just go to their Twitter account or go to the support section of the Snapchat official website for help. You can directly ask them about the issue and get a solution.
Also, let’s learn more about how to open a Snapchat without the person knowing with ease.
Solving the “Snapchat could not connect” issue – Android
Even Android users use Snapchat very often, and they can experience the same trouble – ‘Snapchat There Was a Problem Connecting to The Server‘ as iOS users. So, this section is dedicated to our Android users.
01. Reboot your Android device
A large number of issues on your Android device can be fixed simply with a reboot. In addition to that, rebooting helps you clean RAM and make your device run faster and smoother.
02. Clear cache and app data of Snapchat

To clear the Snapchat app’s cache and app data, you should follow the steps mentioned below.
- Go to the Settings app on your device.
- Go to ‘App Manager’ or ‘Apps.’
- Locate Snapchat under ‘All.’
- Clear cache and data, and then reboot the device.
Please note that clearing the cache and app data will delete app preferences and settings of the respective app. As a result, you will have to reconfigure some settings when you use them.
03. Reset the App Preferences

Resetting the app preferences is another way to address this issue. Let’s see how to do it.
- Open the ‘Settings’ app on the device.
- Then, go to the Apps/App Manager option.
- Locate the option ‘All Apps.’
- Tap on the icon that represents the menu.
- Select the option called ‘Reset App Preferences.’
04. Clear the cache of Google Play Services

- Go to the Settings app and select the option ‘Apps’ or ‘App Manager’ on the device.
- Go to All and select the Google Play Services app.
- Clear its cache and then perform a reboot.
05. Clear framework cache of Google Services
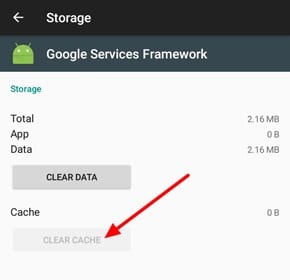
Google Services Framework is the tool that synchronizes the data and device data to function properly. By clearing this framework cache, you can bring back this smooth functionality.
- Go to Settings and select Application Manager.
- Select Google Services Framework under ‘All.’
- Tap on the option ‘Force Stop.’
- Then, tap on ‘Clear Cache’ as well.
- Perform a reboot and see if the issue is solved.
06. Reinstall Snapchat
Uninstall Snapchat and reinstall it on your Android device. If the app has some issues while functioning, reinstalling a fresh copy will solve it.
07. Update Google Play Services
If the Google Play Services is outdated, you will have to update it with the latest version. In this case, you will have to follow the steps mentioned below.
In fact, such an update will resolve issues associated with apps like Snapchat as well as Hangouts, Google Plus, etc.
- Go to Settings and select Security.
- Go to Device administrators.
- Then, deactivate the Android device manager.
- Now, go to the Settings app once again.
- Select Apps and select All.
- Then select Google Play services and tap on Uninstall updates.
- Now, the Play Store will update automatically if there is an update available.
- Go to Settings once again and go to Security.
- Go to Device administrators and activate the Android device manager.
- Reboot the device.
Solve ‘Snapchat could not connect’ issue using Tenorshare Reiboot
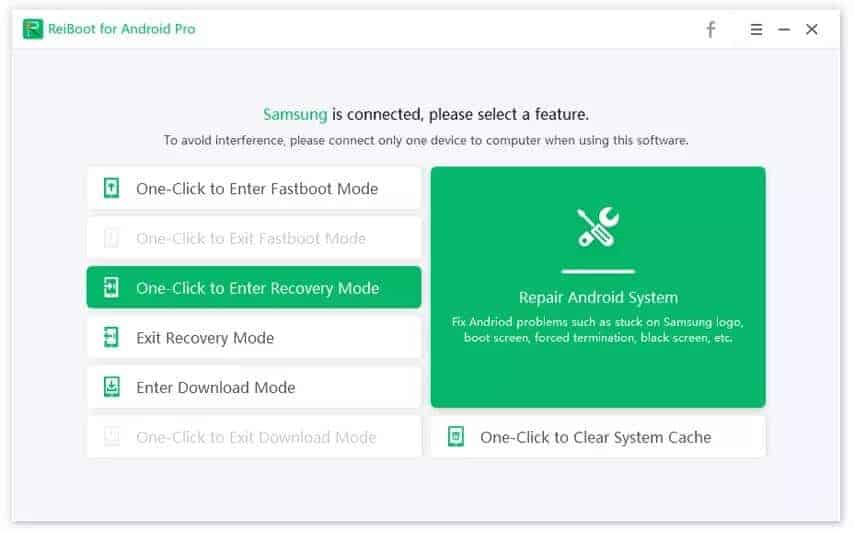
Do you want to know a convenient, professional, and super-fast way to fix the aforesaid issue – Snapchat There Was a Problem Connecting to the Server? If so, you can rely on Reiboot for iOS & Reiboot for Android offered by Reiboot.
It is true that Reiboot for iOS or Android can resolve Snapchat if there is a problem connecting to the server. But in addition to that, this powerful Toolkit can address various other issues with a couple of clicks only and without any data loss.
The best thing is that this Toolkit is available for both iOS and Android devices. In a nutshell, Reiboot is the ultimate solution to fix all complex and minor issues.
So, you can just download Reiboot for iOS or Android and start fixing your device now.
Conclusion
Encountering the “There Was a Problem Connecting to The Server” error on Snapchat can be frustrating, especially when you want to share your favorite moments with friends.
In this article, we discussed the possible causes of this error and provided troubleshooting steps to help you resolve it. By following the outlined solutions, you should be able to reconnect to Snapchat’s servers and enjoy uninterrupted access to the app’s features.
FAQs
- Why am I getting the “There Was a Problem Connecting to The Server” error on Snapchat?
- The error message indicates that Snapchat is unable to establish a connection with its servers, which can be caused by network issues, server maintenance, app version incompatibility, or cache build-up.
- How can I fix the “There Was a Problem Connecting to The Server” error on Snapchat?
- You can try checking your internet connection, restarting your device, clearing the Snapchat cache, updating the app, or reinstalling Snapchat to resolve the error.
- Is the “There Was a Problem Connecting to The Server” error permanent?
- No, the error is usually temporary and can be resolved by following the troubleshooting steps mentioned in this article.
- Are there any specific device requirements to prevent this error on Snapchat?
- Ensure that you have a stable internet connection and that your device meets the minimum system requirements for running the Snapchat app.
- What should I do if the error persists even after trying the suggested solutions?
- If the error continues to occur, you can reach out to Snapchat’s support team for further assistance or wait for any official updates addressing the issue.


