
“Ethernet doesn’t have a valid IP configuration” can occur on any PC connected to an ethernet cable.
This is a common issue that occurs when your Network Interface Card (NIC) cannot get a valid IP address.
A valid IP configuration is required for your computer to communicate with the router and access the internet. The “Ethernet doesn’t have a valid IP configuration” issue can trigger three reasons.
- 01. A malfunctioning router
- 02. An incorrectly assigned IP address on the computer
- 03. Your Network Interface Card (NIC) is malfunctioning
Since there are three main reasons behind the error, different solutions should be deployed.
This article will explain all those solutions so your internet connection will be back with smooth performance.
Disable “Fast Startup” to Resolve “Ethernet Doesn’t Have a Valid IP Configuration”
Your computer system has the feature “Fast Startup.” If you choose to load this feature, it will load the settings from the system’s memory or cache.
As a result, your computer will take significantly less time to boot. Many users have confirmed that they were able to fix the issue simply by disabling the fast-startup feature. Let’s see how to disable it.
- You should right-click on the “Start Menu” or hit the “Windows” key to bring up the WinX menu.
- Now, please click on the option called “Power Options” in the menu.
- You can then click on the option to choose what power buttons should do. You can select the power button’s actions in the left pane.
- Click on the option called “Change Settings.”
- You can move down the window and uncheck the checkbox next to “Turn on Fast Startup (Recommended).” This will prevent your computer from booting with “Fast Startup.”
- Save the changes you have made.
- Close all the windows and restart the computer.
PS: click to figure out how to set up Netgear parental controls effortlessly.
Check the Network Adapter Settings (NIC)
Here are the steps to follow to check and rectify the settings of our NIC.
- Bring up the “Run” dialog box, enter the text ncpa.cpl, and hit OK. Then, in the window labeled “Network Connections,” you should right-click on the option “Network Adapter.” Choose “Properties.”


- On “Ethernet Properties,” click and highlight Internet Protocol Version 4 (TCP/IPv4). Then, go to “Properties.”

- Now, in the new window, select the following properties.
Obtain an IP Address Automatically
Obtain DNS Server Address Automatically

Now, you should move on and reboot your router.
Besides, if you wonder how to fix DNS_PROBE_FINISHED_NO_INTERNET, here are the best answers.
Reboot the Router and Check the Ethernet Cable
First, power off the router. Suppose you are using a modem as well. Power off it as well. You should wait for about 05 minutes. Switch them back.
Once the devices are turned on, you should check if the PC has obtained a valid IP configuration. You should remember that it will take a couple of minutes to get the configurations set.
Then, you should test if the network connection works as expected. If the problem persists, you should use a different ethernet cable to connect your computer and router. If that doesn’t work, connect the PC to a different router.
In addition, performing a factory reset on your router will be a solution. If you are still unable to find luck, just try to replace the network card.
By the way, click to figure out how to fix cellular network not available issues with ease.
Reset Network Settings on Your PC
Another solution you can use is resetting the internet settings. Due to various reasons, the network settings of your PC can conflict or become outdated.
In this case, you should completely clean the DNS server and reset the socket to resolve it.
Enter the command prompt in your system. You can use the “Windows” + “R” combination and enter “CMD.” You can then execute the instructions below one after the other.
ipconfig /flushdns
ipconfig /renew
nbtstat –R
nbtstat –RR
netsh int ip reset c:\resetlog.txt
netsh winsock reset

By the way, learn how to install apps transfer without reInstalling using SymMover.
- Once you have reset the settings, reboot the computer. Then, go to the Control Panel of the system.
- You can now select the option “Change Adapter Settings.” Then, go to “Network and Sharing Center.”
- Right-click on the Ethernet drive and choose the option “Disable.” Wait for a couple of seconds and ‘Enable’ it again.


- Reboot the computer.
Check if the Cables Are OK
If you fail to succeed, it can be a fault in your network cable. Check if the cables are properly connected to the router and PC. Also, check if the network cables are damaged.
When you plug an ethernet cable in, you should hear a perfect click sound. Once the cable is plugged in, you should see the blinking indicator. So, check these aspects as well.
Reinstall the Network Adapter to Fix Ethernet Doesn’t Have a Valid IP Configuration
You can try to uninstall & reinstall the network adapter to resolve this issue.
- Open the Admin menu using the “Windows” + “X” key on the keyboard.
- Enter the text “hdwwix.cpl” and hit “OK.”
- You can now expand the Network Adapters. You can write down the network card’s name now.
- And you can right-click on the ethernet card drive. Choose the option called “Uninstall.”
- You can click on “Action” and then choose the option “Scan for hardware changes.”
Disable Your IPV6 Network
In general, your computer has an IPV4 connection. Nevertheless, there are instances in which it is configured mistakenly for IPV6.
As a result, there can be a conflict, and it can disturb your internet connection. You can fix it by disabling the IPV6 network.
- Locate the network icon in your system tray and right-click on it to see the popup menu.
- Select the option called “Open Network and Internet Settings.”
- Now, click on the option called “Network and Sharing Centre.”
- Choose the option called “Change Adapter Settings.”

- Now, right-click the existing network connection (which you are using now).

- You can then choose the option called “properties.”
- Locate the option “Internet Protocol Version 6 (TCP/IP)”. Uncheck that option.
- You should click on “OK,” so the settings will be applied.

Disable the Option Called “Microsoft Kernel Debug Network Adapter”
Do you have an extra network adapter on the computer in addition to the default one? If both adapters are activated, their performance can interfere with each other and create conflicts. So, you should disable the network adapter and see if the conflict is gone.
- Use the key combination “Windows” + “X” at once.
- You can now choose the option called “Device Manager.”

- You can now click on “View” and check the option “Show Hidden Devices.”
- Now, you can right-click on the option called “Microsoft Kernel Debug Network Adapter.”
- Choose the option labeled “Disable.”

- Once a message appears, you should click on “YES.”

Assign a MAC Address to the Network Card
In certain cases, your MAC address can cause some conflicts if it is not configured properly. In that case, you should manually assign a MAC address.
Mentioned below are the options you should follow to do that.
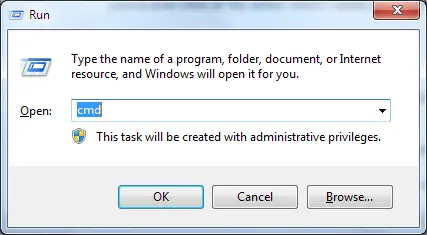
- Use the “Windows” + “R” keys simultaneously.
- Now, you should enter the text “CMD” in the appearing box.
- You can hit “Enter” now.
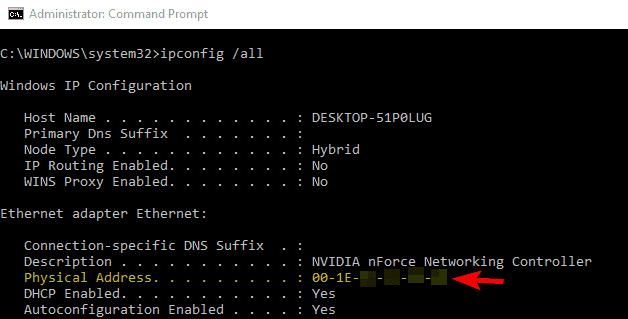
- Now, you should type “ipconfig/all” and hit “Enter.”
- Write down the physical address that is displayed.
- Navigate to the network icon and right-click on it.
- Now, you can select “Open Network and Internet Settings.”
- You will see the “Network and Sharing Center.” Click on it and choose “Change Adapter Settings.”
- Right-click on the network connection you use and click on “Properties.”
- You can right-click on the option called “Configure” and go to the “Advanced” tab.

- Go to “Network Address” and choose “Value.”
- Now, it’s time to enter the previously written down previously.
- Now, you can click “OK” and save the changes.

Enable DHCP to Resolve Ethernet Doesn’t Have a Valid IP Configuration
DHCP is important because it automatically detects and assigns the network configurations on the PC. If it is disabled, the network configuration will not be applied to the PC.
As a result, it can create conflict. So, check and enable DHCP on your PC with the following steps.
- Use the “Windows” + “R” combination to launch the “RUN” box.
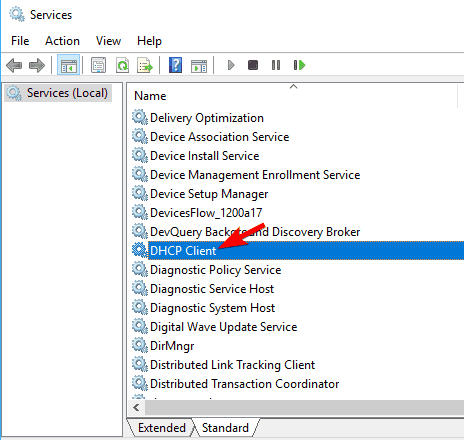
- Now, enter the text “services.msc.” Hit “Enter.”

- In the window that appeared, you should double-click on the DHCP Client option.
- Click on the dropdown and choose the option called “Automatic” from its list.
- Now, click on “Start,” so the process will start.

- You can now go back and choose “Right-Click.” Then, select the option called “DHCP Client.”
- You can now choose “Restart-Service” and select “Yes.”

Reset the Power Management Services
Some computers come with a special feature to save power. This power-saving mode usually disables some functions of the computer in order to save some power. These configurations can be customized as well.
As a result of the customization, the power-saving mode can affect the network adapter as well. If that is the case with you, the power-saving feature should be disabled, at least for the network adapter.
Mentioned below is the guide to do it.
- Find the network icon from the system tray and right-click.
- Then, choose the option called “Open Network and Internet Settings.”
- Now, please click on the “Network and Sharing Center.” Then, choose the option called “Change Adapter Settings.”
- You can now right-click on the internet connection and choose “Disable.”
- You can right-click on it and choose the option called “Properties.”
- Go to the option called “Configure.”
- You can now click on “Power Management.” Then, you should uncheck the option “Allow the computer to turn off this device to save power.”
- Apply the settings by clicking “OK.”

- Go to the system tray & right-click on your internet connection once again. Choose the option called “Enable.”
Reconfigure Your IP Configurations
If you are yet to resolve the “ethernet doesn’t have a valid IP configuration” issue, try this one. In certain cases, the IP configuration itself can obstruct your ethernet connection.
So, to resolve such an issue, you should reconfigure the existing IP configuration and renew the connection.
- Use the “Windows” + “R” keys at once and bring up the “Run” prompt.
- Then, type the text “CMD” and hit “Enter.”
- Once the Command Line Interface is opened, you can enter the command lines below one after the other.
ipconfig /release
ipconfig /flushdns
ipconfig /renew
Please note that you should hit the “Enter” key after typing each line.
Deactivate Your Antivirus Program
If you have installed a 3rd-party antivirus tool on your computer, it may influence your network’s functionality. So, if you are experiencing a network issue even after trying the above methods, try disabling the antivirus.
If the issue goes away once you disable the antivirus, that means the antivirus is the culprit. Please follow the below steps to disable the antivirus program on your system.
- First, you should right-click on your antivirus program’s icon on the system tray.
- Your antivirus program will offer you an option to disable it.
- If you don’t see any option to disable it, just Google how to disable that antivirus.
Run CHKDSK
Some users say that they were able to resolve the issue after running the CHKDSK command. In fact, the purpose of running this command is to find the potentially corrupted hard disk areas.
Mentioned below is how you should perform it.
- Bring the “Run” box up by pressing the “Windows” + “R” keys at the same time.
- Then, you should key in the text “CMD” in the run box and hit the “Enter” key.
- Now, once the Command Line Interface is opened, you can type “chkdsk c: /f.”
- Hit enter so the command will be initiated.
- When prompted, hit “Y,” and the disk check scan will begin.

That’s it!
Frequently Asked Questions
Q1: What does the error message “Ethernet doesn’t have a valid IP configuration” mean? The error message indicates that there is an issue with the IP configuration of your Ethernet connection, preventing it from obtaining a valid IP address and establishing network communication.
Q2: Can a faulty Ethernet cable cause an invalid IP configuration? Yes, a faulty Ethernet cable can disrupt the connection and lead to an invalid IP configuration. Ensure that the cables are in good condition and properly connected.
Q3: Why is it important to update network drivers? Updating network drivers is crucial as outdated or incompatible drivers can cause communication issues and result in an invalid IP configuration. Newer drivers often include bug fixes and improvements for better network performance.
Q4: Should I disable my antivirus or firewall permanently? No, you should only disable your antivirus or firewall temporarily for troubleshooting purposes. Once the issue is resolved, re-enable them to ensure the ongoing security of your system.
Q5: What should I do if none of the troubleshooting steps work? If the provided troubleshooting steps do not resolve the issue, it is recommended to contact your Internet Service Provider (ISP) for further assistance and troubleshooting.
Conclusion
Encountering an “Ethernet doesn’t have a valid IP configuration” error can disrupt your internet connectivity and hamper your online activities. However, by understanding the underlying causes and following the appropriate troubleshooting steps, you can resolve this issue and restore a valid IP configuration.
Remember to check physical connections, reset the network adapter, release and renew the IP address, update network drivers, disable antivirus or firewall temporarily, restart the router and modem, and seek assistance from your ISP if needed.


