
Service host local system high disk, memory, and CPU is a real frustration for many users, affecting PC performance. Whether you use Windows 7, 8, or 10, this issue can occur at any time. But the good news is that we will help you fix it.
This article will reveal multiple options to fix the service host local system high disk issue. You can go through all these methods and find the best one that matches your scenario. Some ways fix the issue temporarily, and some methods can fix it permanently.
Whenever you notice the Service Host process, that might be consuming a substantial amount of resources of your computer. By accessing the task manager, you can know the number of resources the Service Host utilizes. If it takes excessive resources, you should do something to stop the service.
Otherwise, that might affect the whole processing speed of the computer. Service host local system high disk can exist in CPU, disk, and memory or excessive network bandwidth.
Introduction to Service Host Local System High Disk, Memory and CPU
You can press Ctrl + Alt + Del to access the Task Manager without any issue. The “Process” tab will be automatically selected. You can then scroll down to find various processes related to Service Host.
For instance, you can see options like Service Host: Local Service, Service Host: Network Service, etc. As we already know, service host local system high disk can make your system run slow. Well, what makes this process consume such a large amount of memory? Let’s find it out.
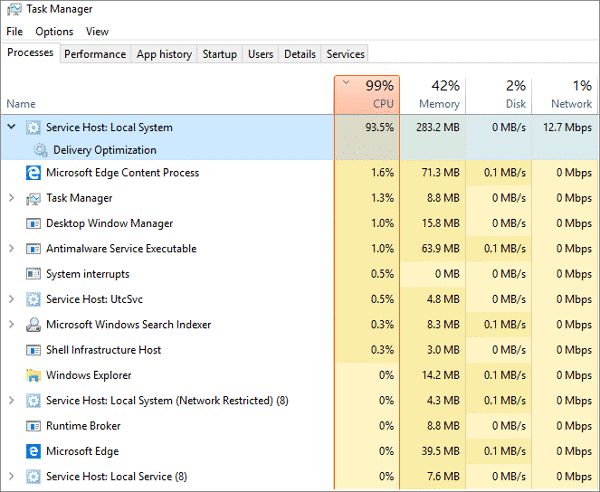
In simplest terms, Service Host: Local System comes as a collection of processes that runs in the system. You can also call it a generic service hosting container. This bundle or processes include Windows Auto Update and other system services.
To run these updates and other services requires a lot of system resources. That is why Service Host functions take up a substantial amount of RAM, disk, and memory capacity. You can notice that it takes an increased amount of resources, particularly after a Windows 10 update.
What Are the Solutions to Service Host Local System High Disk, Memory & CPU Usage?
As we mentioned earlier, there are multiple solutions to address this issue. Let’s see how to solve this issue using those methods from this point onwards.
PS: here, you will learn more about What Makes The System Volume Information Large, also, As how to fix them quickly.
Method 1: Optimize the System and Restore Hard Drive Health
To begin the process, you should download the program named EaseUS Partition Master on the computer. Then, it would help if you got it installed and launched.
Then, you will have to follow the procedure mentioned below.
To Address Potential Errors Related to Hard Disk
a) Launch EaseUS Partition Master on the computer. You can then locate the disk and right-click on the partition to be checked. On the popup menu that appears, you should select “Check File System“.
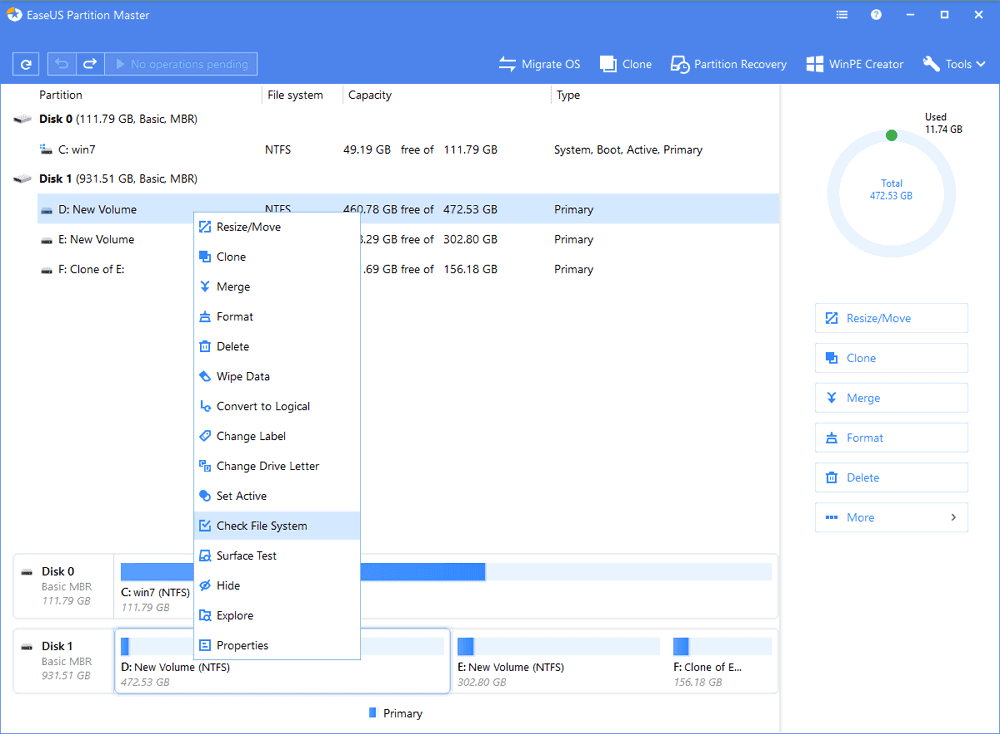
b) When the File System Window opens, you should select the option labeled “Try to fix errors if found“. Then, you should click on the option “Start“.

c) Now, the software itself will start to check the disk’s partition file system. After the check, you can press “Finish“.

d) The software will automatically check the potential hard drive errors and system file errors.
To Remove Redundant Network Data, System Logs and Files
a) Click on the option “System Optimize” located under the Tools of “EaseUS Partition Master”.
b) Click on the below-mentioned options one after the other.
- Junk File Cleanup
- Large File Cleanup
- Disk Optimization
It will help you eliminate potential errors associated with the above aspects.
Method 2: Disable Service Host Local System Directly
Here’s how to disable the service host local system directly.
a) Go to Task Manager by pressing Ctrl + Alt + Del and go to Service Host: Local System. This will give you an insight into the processes that are eating up disk, CPU, and memory.
b) When the troubling items are identified, you can quickly eliminate them by right-clicking and selecting “End Task“.

c) You can repeat the above process to get rid of all the tasks that are troubling the performance.
d) When the items are identified, you can right-click on them and select the “Open Services” option.
e) You can now go through the services available on Task Manager. Then, you should find the service under the same name by right-clicking on it. You can then click on “Stop.”
f) After finding the troublesome service, you can double-click on it. Then, you can expand the option Startup type menu and disable it. After that, you should click on Apply and press OK to complete the process.
Method 3: Find Backup Intelligent Transfer Service and Disable It
a) Go to Windows Task Manager (you already know how to do it) and click on “Services.”
b) On the Services window, you should go to the “Open Services” option and click on it.

c) You will find a new window that displays a large range of services. You should see the “Background Intelligent Transfer Service” option in this window. Then, you should right-click on it and press “Stop.”
Method 4: Disable Superfetch Service
a) Press and hold the Windows key and “X” simultaneously. This option will open up a new menu to find Command Prompt. Click on it.
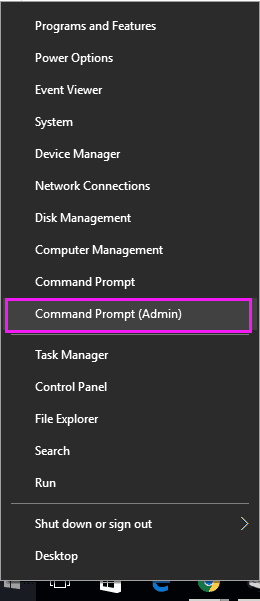
b) Once the command prompt is opened, you can type “net.exe stop superfetch.” Then, you should press the Enter key to disable the service.

Method 5: Disable the Automatic Updates
You can try disabling automatic updates and check if it solves the service host local system high disk issue. To do that, you should follow the steps mentioned below.
a) Use the key combination “Windows + R” to open up the “Run” dialog. Then, you should key in the phrase “services.msc” and hit Enter.

b) You will see a window open with a range of services to select. Navigate to find the option “Windows Update Service.”
c) Double-click on the option Windows Update service, and you will see a new window open.
d) Find the option Startup type under General. Then click on “Disabled,” located on the drop-down list. Then, you should click on OK to apply the changes you have made.
e) Now that you have disabled the Windows update permanently go to Method 2. End the task “Service Host: Local System” there.
Method 6: Update the Drivers
Suppose that none of the above options work. It would help if you tried updating the drivers as well. That is because this issue can occur due to an old device driver.
To make it happen, you can set drivers to update automatically to the latest version. To make it easier, we recommend a tool like Driver Easy.
With the assistance of Driver Easy, you can update the drivers pretty conveniently. This software does all the hard work for you simply by finding and updating the drivers. You don’t even need to know the OS version if you use this software. Driver Easy can scan for the drivers pretty fast and update them automatically.
This handy software tool comes with a free version and a pro version.
Here’s What You Should Do with Driver Easy
a) First, download and install the software Driver Easy.
b) Launch the program now and click on the option “Scan Now.” The program will now scan for all the outdated and problematic drivers.

c) Once the scanning is done, you can click on the “Update” button. Then, you will see that the drivers are automatically downloading and updating. This option is available on the free version as well.
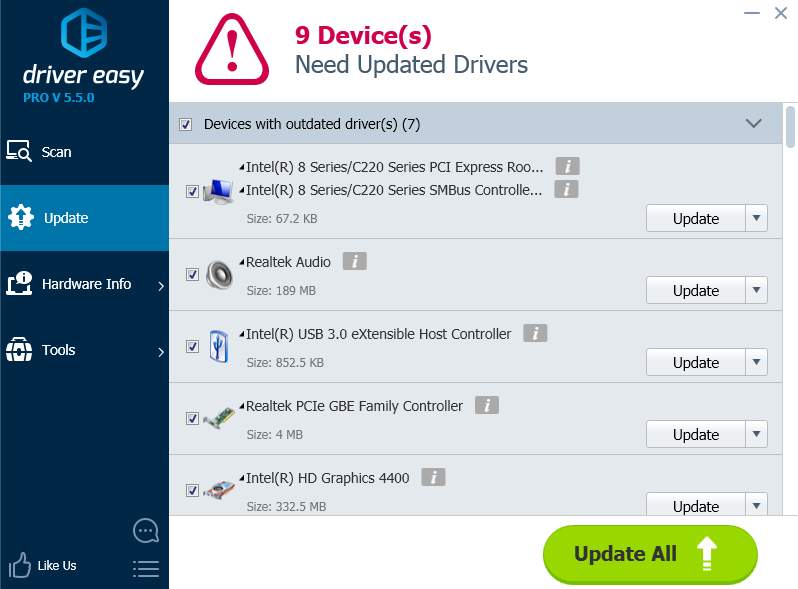
d) If you use the Pro version, however, you can click on the option “Update All.” This will fix all the driver issues with a single-click operation.
Tips to Prevent Future High Resource Usage
To minimize the chances of encountering Service Host Local System high usage in the future, consider the following preventive measures:
- Regular System Maintenance: Keep your system updated with the latest Windows updates, device drivers, and security patches to ensure optimal performance and compatibility.
- Reliable Antivirus Software: Install reputable antivirus software and keep it up to date to protect your system from malware and potential exploits.
- Limited Background Programs: Avoid running unnecessary background programs that consume system resources, as they can contribute to high usage scenarios.
- Monitor Resource Usage: Periodically check your system’s resource usage using Task Manager or other monitoring tools to detect any unusual patterns and address them promptly.
By the way, if you wonder what is Shell Infrastructure Host? Click to read more.
Frequently Asked Questions (FAQs)
- Q: How can I determine if the Service Host Local System process is causing high resource usage? A: You can use the Task Manager, Resource Monitor, or Event Viewer to identify the associated services causing high resource consumption.
- Q: Will disabling essential services under the Service Host Local System process affect my system’s stability? A: It is crucial to exercise caution when disabling services. Only disable non-essential services, and if you are unsure, seek guidance from a knowledgeable source.
- Q: Why does the Service Host Local System process consume high resources after a Windows update? A: Windows updates may introduce compatibility issues or errors, leading to high resource consumption. Installing the latest updates can often resolve these issues.
- Q: Can malware or viruses exploit the Service Host Local System process? A: Yes, malware and viruses can exploit the Service Host Local System process to execute malicious code, resulting in increased resource usage.
- Q: How frequently should I perform malware scans on my system? A: It is recommended to perform regular malware scans at least once a week using reputable antivirus software to ensure system security and stability.
Conclusion
Well, that is how to fix the service host local system high disk and get your PC repaired. You can go through the list once again and find the most appropriate option for you. However, as we believe, the very first option should fix the issue straightforwardly.


