It is quite common for users to face the ‘netwtw06.sys failed’ error on their Windows 10. Users can see death’s blue screen when they try launching an application or disconnecting any external device from their system. It is important to resolve this error immediately.

Usually, netwtw06.sys error comes along the error messages, ‘DRIVER_IRQL_NOT_LESS_OR_EQUAL’ and ‘PAGE_FAULT_IN_NONPAGED_AREA, SYSTEM_THREAD_EXCEPTION_NOT_HANDLED‘. Now, why does this netwtw06.sys failed issue show up in the first place?
This issue may happen because of misconfigured device drivers, corrupted files, corrupted Windows registry, outdated drivers, and broken system files.
Now, let’s see how to resolve the netwtw06.sys error on Windows using different solutions!
Solution 1: Update Your Wireless Network Driver
As stated above, outdated drivers can trigger netwtw06.sys failed error. So, if your wireless network driver is of the older version, then updating the driver is the best thing that you can do to deal with this annoying issue.
To eliminate this issue, you can manually update your wireless network driver.
Steps to Eliminate the Netwtw06.Sys Error by Updating the Driver:
It is very simple to carry out this procedure. Have a look at the steps below:
Step 1: Choose ‘Device Manager’
First, right-tap on the ‘Start’ tab to choose the ‘Device Manager’ option.
Step 2: Select ‘Update Driver’
From there, double-tap on ‘Network Adapters’ and then, right-click on the driver labeled as ‘Wi-Fi Adapter.’ Next, select the ‘Update Driver’ option.
Step 3: Install the Recent Version
Select ‘Search automatically for updated driver software.’ Now, your system will download the latest version and install the same for your wireless network driver.
Step 4:Restart the System
Start your Windows PC again and check if the netwtw06.sys error persists or not.
Solution 2: Roll Back Your Wireless Network Driver
Are you struggling with the netwtw06.sys failed issue after updating the wireless network driver? If so, rolling back the wireless network driver is the next thing you can try.
This is because sometimes new versions come up with some glitches and bugs. In that case, it is best to go back to your driver’s previous version to deal with the problem if you face the netwtw06.sys issue after updating your driver to the latest version.
Steps to Resolve the Netwtw06.sys Error by Rolling Back the Network Driver:
To perform this action, go through the following instructions:
Step 1: Select ‘Device Manager’
Press the tabs ‘Windows’ and ‘X’ simultaneously for choosing the ‘Device Manager’ tab.
Step 2: Choose the ‘Properties’ Tab
Next, double-tap on ‘Network Adapters’ for expanding and then, right-tap on the driver labeled as ‘Wi-Fi adapter’ for selecting the ‘Properties’ tab.

Step 3: Choose ‘Roll Back Driver’
Now, visit ‘Driver’ and tap on the ‘Roll Back Driver’ option to install the driver’s stable version.
Step 4: Reboot the System
Reboot the system to take the changes into effect. Now, see if the issue netwtw06.sys failed has been resolved.
Solution 3: Launch SFC for Eliminating the Netwtw06.sys Error
For making the Windows system run normally, system files remain very crucial. One cannot remove these files manually, even if they have the permissions.
If your computer has several corrupted system files on it, then various errors can show up, like the netwtw06.sys failed error. To eliminate this annoying issue, you have to launch the SFC tool.
Steps for Running This SFC Tool to Resolve This Issue:
To eliminate this frustrating issue, you can try running this SFC tool in the following way. It is easy to perform this action.
Step 1: Right-click on ‘Command Prompt’
In the search column, type cmd and right-click on ‘Command Prompt’ to select ‘Run as administrator.’ Tap ‘Yes’ to view ‘User Account Control.’
Step 2: Hit Enter
Put in ‘sfc/scannow‘ and then hit Enter.

Step 3: Wait for Some Time
You need to wait for this process to end without interruptions. Usually, it detects the damaged files and automatically repairs them.
Now, restart the computer to check whether the netwtw06.sys failed issue is fixed on your Windows PC.
Besides, regarding the issues of Entry Point Not Found, click to fix them now.
Solution 4: Run DISM to Resolve the Issue
If the above method doesn’t resolve the issue, you should try running the DISM tool. Also, DISM helps to scan damaged system files and automatically repair them.
So, you can give it a shot to eliminate the netwtw06.sys issue on your Windows computer.
Steps for Running DISM to Resolve the Netwtw06.sys Error:
To run this DISM tool on your system, follow the instructions below.
Step 1: Open the Command Prompt
First, open the Command Prompt and select ‘Run as Administrator’ as stated in the above method.
Step 2: Hit Enter
Next, enter “DISM.exe/Online/Cleanup-image/Restorehealth” and then hit Enter on your keyboard.

Step 3: Reboot the system
Now, wait for the process to end. The process might take a bit longer to end if some corruption is located. Restart your computer to see if the netwtw06.sys failed error has been successfully eliminated.
Solution 5: Launch CHKDSK to Fix the Netwtw06.sys Error
Sometimes, the netwtw06.sys failed issue occurs because of the corrupted hard drive. Thus, you need to launch the CHKDSK tool to check if there are any bad sectors on your drive and then resolve them.
Steps to Resolve the Netwtw06.sys Error by Running CHKDSK:
Running the CHKDSK tool to get rid of the netwtw06.sys failed error is helpful. To do this, follow the step-wise guide mentioned below.
Step 1: Open the Command Prompt
First, please open the Command Prompt window & then run it as administrator.
Step 2: Hit Enter
In the next window, enter “chkdsk C:/f /r /x” and then hit Enter. Here, C is the drive where you save the operating system.

Note: If you come across an error message claiming that “Chkdsk cannot run because the volume is in use by another process. Would you like to schedule this volume to be checked the next time the system restarts”, then put in “Y” in the Command Prompt window.
Step 3: Reboot the System
Once the process gets over, reboot the system and see if the netwtw06.sys failed error has been fixed.
Solution 6: Carry Out the System Restore
If you already have a system restore point on your system in advance, you can carry out the system restore to revert the system to an earlier normal state. To perform this action, you need to go through the following instructions.
Steps to Resolve the Netwtw06.sys Error:
To eliminate this frustrating issue from your computer, follow the instructions below.
Step 1: Launch the Run Dialog Box
First, you must press the tabs ‘Windows’ and ‘R’ together. This will launch the Run dialog box.
Step 2: Open the System Restore Tab
Now, put “rstrui” in the dialog box and press OK to open the System Restore tab.
Step 3: Tap on Next
From the next window, choose the ‘Next’ tab. After that, you must select a system restore point from the given options and tap on the ‘Next’ tab.
Step 4: Tap on Finish
Lastly, confirm the system restore point. Then, press the ‘Finish’ option. Now, you will come across a message reporting, “Once started, System Restore cannot be interrupted. Do you want to continue?” You have to click on ‘Yes.’

Once this system restoring procedure is over, your system will normally run after getting rid of the netwtw06.sys failed issue.
Tip: How to Access Lost Data on Your Windows PC After Accidentally Losing It
It is possible to lose your precious files from the system while trying to eliminate this frustrating netwtw06.sys error. Don’t worry if you face this situation because there is a simple way to retrieve your lost data.
Most users never expect to get back their precious files once they lose them accidentally. Today, various powerful data recovery programs are on the internet, capable of completely recovering lost data. One such advanced tool is Tenorshare 4DDiG for Windows.
Tenorshare 4DDiG for Windows works best to retrieve lost data on Windows PC. Some tech websites and many users recommend this program for its reliability and precision work.
Now, let’s find out how to retrieve your data if accidentally deleted during the netwtw06.sys failed the fixing process.
Steps to Get Back Your Lost Data with Tenorshare 4DDiG for Windows:
With Tenorshare 4DDiG, users can get back their lost data within minutes using the below steps.
Step 1: Install Tenorshare 4DDiG
Initially, users have to download Tenorshare 4DDiG and install the same on their Windows PC. After that, they need to run the program.
Step 2: Choose ‘The Whole Computer’
Now, users need to select the partition from where they have lost their files. If they do not know the exact partition, then it is better to go with the ‘The Whole Computer’ option.

Step 3: Tap on ‘Scan’
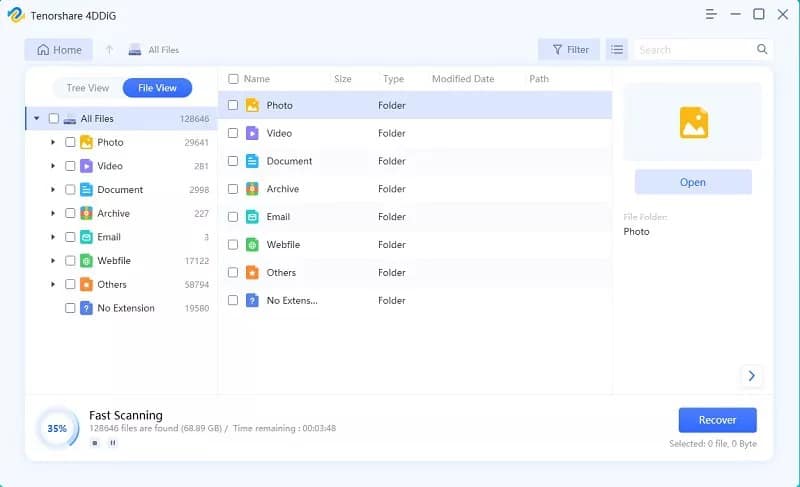
Next, they have to choose ‘Scan’ from the menu. Now, their system will be thoroughly scanned.
Step 4: Preview your files
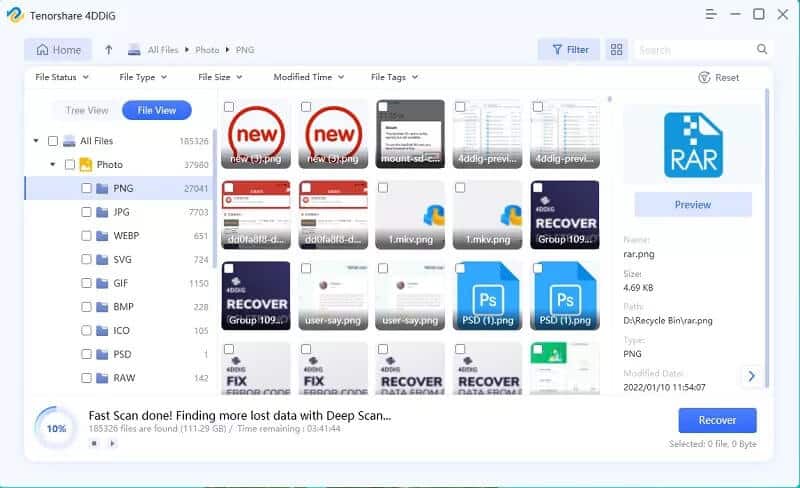
Once the scanning process is over, users can preview the scanned results available to them. This means that you can restore the files selectively.

Step 5: Tap on ‘Recover’
Lastly, users just need to choose the files they like and tap on the tab ‘Recover’ below.

So, this is the simplest method to recover lost files on your Windows PC if you have accidentally lost your files while eliminating the netwtw06.sys failed error.
FAQ: All You Need to Know About “Netwtw06.sys Failed”
Now, let’s delve into some frequently asked questions about the “Netwtw06.sys Failed” error.
What is the Netwtw06.sys file?
The Netwtw06.sys file is a system file associated with the Intel Wireless LAN driver. It plays a critical role in managing your computer’s network functions. When this file goes haywire, you’re likely to encounter the “Netwtw06.sys Failed” error.
How does the “Netwtw06.sys Failed” error affect my computer?
The “Netwtw06.sys Failed” error can wreak havoc on your computer’s performance. It can lead to frequent system crashes, slow performance, persistent error messages, and issues with your wireless network connection.
How can I prevent the “Netwtw06.sys Failed” error?
To prevent the “Netwtw06.sys Failed” error, it’s crucial to keep your system updated, run regular system file scans, and maintain a secure environment to prevent malware or virus infections.
What do I do if updating my network drivers doesn’t fix the “Netwtw06.sys Failed” error?
If updating your network drivers doesn’t do the trick, try running a System File Checker (SFC) scan, checking for conflicting hardware or software, or consulting with a professional to eliminate the possibility of a malware infection.
Is the “Netwtw06.sys Failed” error a sign of a virus or malware?
While the “Netwtw06.sys Failed” error isn’t necessarily a sign of a virus or malware, these threats can cause the error by corrupting system files or registry entries. Regularly scanning your system for threats can help prevent this error.
Can the “Netwtw06.sys Failed” error cause permanent damage to my computer?
If left unchecked, the “Netwtw06.sys Failed” error can lead to persistent issues that hinder your computer’s performance. However, it’s unlikely to cause permanent damage if addressed promptly and correctly.
Conclusion
So, don’t worry when the netwtw06.sys failed error flashes on your Windows PC. This is because you have several ways to deal with this annoying issue. Make use of the above-mentioned useful methods to deal with the netwtw06.sys error.
All of these methods are pretty effective. You do not need to try all of them. Just go through them one by one until you fix the issue effectively.
However, there is a possibility of losing your precious data because of the adverse effects of the netwtw06.sys failed issue. So, use Tenorshare 4DDiG for Windows to retrieve your lost data from the Windows PC.


