
When it comes to Apple, it is very consistent in offering updates to all iOS devices. Each update comes with some enhancements and new features for iOS devices.
When a new update makes its way, users can update their devices by navigating to the ‘Update’ tab within settings.
In most cases, the update procedure follows smoothly, and the device gets updated with no errors.
However, in some cases, people get the cellular update failed error. This error could result from some hardware or software issues on iOS devices.
No matter what the reason is, users can fix this error on their own. Here, we have listed some of the most effective solutions for resolving the ‘cellular update failed’ issue.
Using these different ways, you can easily fix the update failed error.
Part 1: What Does the Cellular Update Fail Error Signify
Cellular update failed refers to a situation where users receive a notification saying ‘iPhone cellular data update failed’ when they try to update the iOS version on their iPhones.
In iPhone 11/X/8/7, you will find the ‘No Service’ error in place of the cellular network’s signals. This error disables your device from utilizing cellular services like text messages, receiving and making calls, and restricting mobile data usage.
PS: here, you will figure out how to fix iPhone stuck on verifying updates.
Part 2: Different Solutions to Resolve the Cellular Update Failed Error
This article will present eight solutions for the ‘cellular update failed’ problem on iPhone models running on the recent iOS version, such as iOS 16. For people who are looking for the best solution, Tenorshare ReiBoot is what they need.
Tenorshare ReiBoot will help you fix the ‘cellular update failed’ issues. Also, the other methods are quite simple and resolve the issue effectively. So, have a glance at these amazing solutions below!
Method 1: Incredible Way to Resolve Cellular Update Failed
Tenorshare ReiBoot is an effective and very simple-to-use program to fix iPad and iPhone problems associated with the software.
Follow some simple steps to fix the ‘cellular update failed’ error with the help of this amazing repair tool. Tenorshare ReiBoot is available for both Mac and Windows PC.
Steps to fix cellular update failed using Tenorshare ReiBoot:
To resolve the issue of cellular update failure, you need to follow some simple steps. Using Tenorshare ReiBoot, one can fix this frustrating problem within a few minutes. No, wait, no more. Download this incredible application and get started!
Step 1: Install Tenorshare ReiBoot
Firstly, download and install ReiBoot on your system. After a successful installation, launch the program.
Step 2: Tap on ‘Repair Operating System’
Next, connect your device to the system and choose the ‘Start‘ button.

Step 3: Click on ‘Fix Now’
Tap on the tab ‘Fix Now.’ Choose the track where users like to download the latest iOS firmware. Now, wait for some time, as the downloading depends on your internet speed.
Once downloaded, users can choose the firmware package. One can even download this firmware package through any download manager or browser. To do so, tap on ‘Copy‘ to get the download URL.


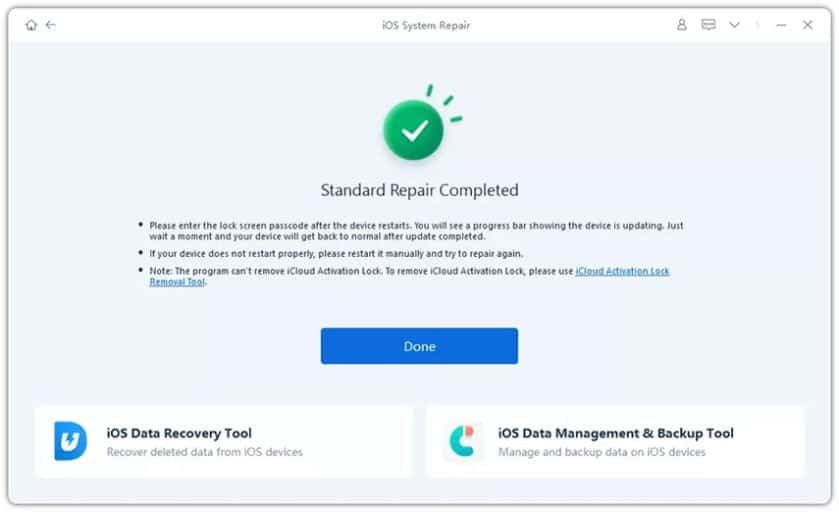
Step 4: Choose the ‘Repair Now’ tab
Once you have downloaded the file, select the ‘Start Standard Repair‘ option. After completing the repair procedure, tap on ‘Done.’ Now, you can check whether or not the cellular update failed problem persists.
So, you have successfully fixed the problem using Tenorshare ReiBoot. This program even repairs various other problems associated with an iOS system.

Method 2: Switch On and Off Airplane Mode to Fix the Update Problem
You can try switching on or off airplane mode to resolve the cellular update failed error. Go through the steps listed below to do so.
1: Visit Settings on your device among the home screen applications.
2: Switch on the toggle present across the menu ‘Airplane Mode.’ You will find this option at the bar regarding disabled wireless connections. It could be turned on from your device’s Control Center.

- Firstly, swipe the lock screen or home interface up.
- Force restart the iPod touch/iPad or iPhone.
- Now, enable the Airplane mode, and after that, disable it on your device.
You can fix the ‘cellular update failed’ error by permitting and disabling the Airplane mode. It will disconnect all wireless services on your device and then reconnect them.
Next, examine if the error ‘No Service’ has vanished and signals appear. If the signals come back, you can use the cellular network.
Method 3: Restart the Device
You can sometimes fix the cellular update failed problem just by restarting your iPhone. To restart iPhone 7/8, you have to press the power tab until you come across a slider to power off the phone screen.
Now, drag this slider and then wait for a while. You must hold the power tab again until you see the Apple logo.
For restarting iPhone 14/13/12/11/XS/X, please press the volume tab (down or up) and power tab together and keep holding them unless you see the power off slider on your screen.
Next, drag this slider and then wait for about 30 seconds. After that, press your phone’s power tab until you come across the Apple logo.

Once you have restarted your device, you have to check if the cellular update failed. Whether the problem persists or not. If your cellular signals show up, the issue has been resolved successfully.
Method 4: Examine and Install Cellular Carrier Updates
As you know, carrier updates do not appear as often as the updates for iOS. However, these updates get released by the carrier or Apple to enhance your iPhone’s cellular connection.
1: Visit Settings.
2: Now, tap on the General tab from your phone settings.
3: Tap on About. If carrier updates are available, a pop-up appears within a few seconds. Now, you need to click on Update.

Carrier updates could eliminate the cellular update failed problem. Examine the cellular connection to verify it.
Method 5: Update your Device to the Recent iOS
The recent iOS 15 has emerged for downloading and installing on iPad and iPhone devices. This method will resolve the failed cellular update issue.
Follow the below instructions for updating your device and eliminating the annoying issue.
Steps to fix the cellular update failed error:
Users must follow some simple steps below to eliminate cellular update failure. It takes a few minutes to update your device to the latest iOS version.
1: First, visit the Settings application on your device from the main interface.
2: Now, look for the General tab and click on it.
3: Next, navigate to the Software Update option and select the same.

If you come across a new update under this tab, you need to click on ‘Install’ to update your device to the recent iOS version. Once you have completed the update process, see if your cellular network works fine or not.
The network signals will appear on the top if you do not see the error ‘cellular update failed’ anymore. It means that the software update has resolved the network issue.
Method 6: Eject and Reinsert the SIM card
Move on to the following method if the earlier ones did not work for you. Now, try to eject and reinsert your SIM card to eliminate the cellular update failed error. To do this, you need to eject your SIM tray with the help of a pin.
After this, push it back into your device. Wait for about 20 seconds. Then, check if you have successfully removed that annoying issue.
Method 7: Reset the Network Settings on Your iPhone
You have to reset your device’s network settings to fix the cellular update failed error in this method. To reset your iPhone’s network settings, follow the instructions below.
Steps to fix the cellular update failed issue:
To fix this annoying problem, look at the steps listed below.
1: Initially, open Settings on your iPhone.
2: Now, move to the tab General.
3: Then, keep scrolling to find the Reset tab.
4: Under this tab, select the Reset Network Settings option.

You have to wait for your device to replenish the screen. Once done, you can ensure that the cellular update failed error does not flash on your smartphone again.
Method 8: Contact Wireless Carriers or Apple
Instead of going after unknown software and hardware solutions, it is best to ask for professional help.
If you face a failed cellular update issue on your iOS device, you can go to your carrier and Apple centers to ask for help. It is advised to call on the helpline number of your carrier and tell them your problem in detail.
However, you need to visit the Apple care center to seek assistance in this regard. Surely, this will help you in fixing this error effectively.
FAQs
Q1: Why am I getting a “Cellular Update Failed” error?
The “Cellular Update Failed” error can occur due to various reasons, such as network connectivity issues, outdated carrier settings, or software glitches on your device.
Q2: Can I fix the error by simply turning my device on and off?
Sometimes a simple restart can resolve temporary network glitches and fix the “Cellular Update Failed” error. It’s worth trying before proceeding with other troubleshooting steps.
Q3: What should I do if updating carrier settings doesn’t fix the error?
If updating carrier settings doesn’t resolve the “Cellular Update Failed” error, you can try resetting your network settings, updating your device’s software, or contacting your carrier for further assistance.
Q4: Is the “Cellular Update Failed” error a common issue?
Yes, the “Cellular Update Failed” error is a relatively common issue that can occur on various smartphone models. However, the troubleshooting steps provided in this article should help you resolve it.
Q5: Should I contact my carrier if the error persists after trying all the troubleshooting steps?
Yes, if you have followed all the troubleshooting steps and the “Cellular Update Failed” error persists, it’s recommended to contact your carrier for personalized assistance and further troubleshooting.
Conclusion
The cellular update failed issue is not just associated with software; some iPhone users have told Apple centers that it could be a hardware problem.
This hardware issue causes cellular network failure in devices where the wireless networks work perfectly.
The methods listed in this article are some of the best software fixes. These fixes will help you eliminate the cellular network failure problem.
Out of all fixes, the best to resolve the issue is using Tenorshare ReiBoot. However, if you face this problem due to hardware, you must get your device repaired from Apple centers or other local repair centers.
To fix the problem on your own, get the Tenorshare ReiBoot application and resolve all iOS-system-related issues in a few steps.


