In this article, we will discover methods to unprotect Word documents with or without passwords. Find out how to regain access to your locked documents in a few simple steps.
Introduction
Microsoft Office includes a lot of widely used and popular programs. Excel enables users to create spreadsheets, PowerPoint offers a simple slideshow solution, and Word is undoubtedly the most popular word processing program.
It isn’t limited to these programs – Microsoft Office includes tens of solutions across desktop, mobile, and server platforms. Many of their programs are also available as online solutions too.
One feature that users demanded, and received, is password protection. This has led to some users querying about how to unprotect Word documents.
Adding a password to your Word documents has a lot of benefits. Above all, though, it prevents unwanted eyes from viewing sensitive information. Whether it be employee personal information or a diary entry, password-protecting the file is the best thing to do.
If you do this and forget your password, that can be a problem. If you find yourself in this situation, then don’t worry. We’ve got some solutions for you to try out.
PS: You may wish to read more about how to remove passwords from PPT.
Methods for Protecting Word Documents
Before we show you how to unprotect Word documents, you might not even know how to protect the document.
Knowing how to add a password to a Microsoft Word file is very useful; the methods below will explain how to do so.
Also read: How to Add and Remove Password from Excel File.
Adding Password Protection
Microsoft Word offers two password protection features. This first method adds complete password protection that stops unauthorized users from accessing the file in any capacity.
#1 – Open the Microsoft Word file that you want to add password protection to.
#2 – From the menu at the top, click on “File” and select “Info.”
#3 – Click on “Protect Document,” and from the list of options, click “Encrypt with Password.”
#4 – A pop-up window will now appear and in the box, type a password. Remember to make this password memorable, as you’ll require it to access the Word file every time you open it.
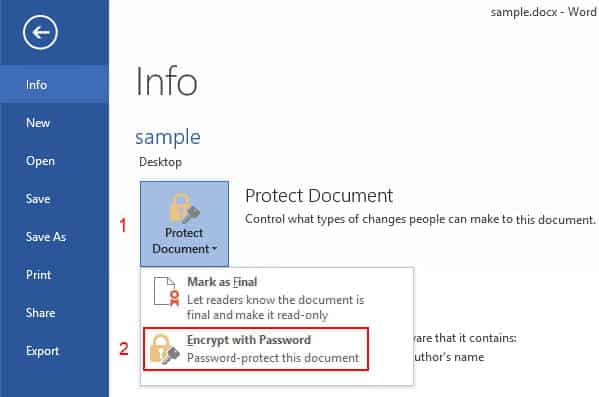
#5 – After entering a password, click “OK” and close the window. Reopen the document to verify that adding the password was successful.

After you follow these steps, nobody without a password can open the file. This isn’t the only protection feature available to Microsoft Word users.
Adding Editing Restrictions
Alternatively, you can add editing restrictions before you proceed to unprotect Word documents. Doing this allows users to read the document, but they won’t be able to make any changes.
#1 – Open the Microsoft Word file where you will add editing restrictions.
#2 – Click the “Review” tab at the top of the screen and select “Restrict Editing.”

#3 – A menu on the right side will now appear. Use this to enable the restrictions you’d like to have in place.
#4 – Press the “X” at the top-right of this menu to close it and finish the process.
You can also add editing restrictions through the “Info” menu in the “File” tab. Either way, you can easily add this restriction, which will show readers the content but won’t allow them to change it.
Using Password to Unprotect Word Document
Now you know about adding passwords to a Microsoft Word document and how to limit what changes a user can make. But what happens when you want to remove the password and unprotect the Word document?
There are various methods for removing the password. In this first guide, we’ll cover the process if you already know the password. You can do this directly through Microsoft Word.
#1 – Locate and open the document you want to unprotect. Enter the password that you previously chose to set for the file.
#2 – Click on the “File” tab and select “Info” from the menu on the left.

#3 – Now that you’re on this menu, click “Protect Document,” and from the options that appear, click “Encrypt with Password.”
#4 – You’ll see a pop-up box appear containing the document’s password. Delete the password entry and press “OK.”
#5 – If you now close Microsoft Word and open the file, you will no longer be instructed to enter a password.
Creating a document and adding a password makes it much easier to unprotect it. The steps above are evidence of how easy it is.
What is more difficult is if you don’t have the password, whether that’s because you didn’t create the file or you aren’t supposed to have access to it altogether.
Removing Password with PassFab for Word
Having the password is more useful for unprotecting a Word document. In many cases, this isn’t an option – people forget what password they added or download files that others have added passwords to.
To unprotect Word documents without a password, your best option is to use PassFab for Word.
- Capable of recovering any forgotten passwords
- Removes editing restrictions from Word documents that you can’t edit
- Utilizes four different password-cracking methods to ensure success
- Uses the computer’s CPU and GPU to accelerate the unprotection process
- You can pause the password recovery and start it again later
- Most files have the password removed/recovered within minutes
- Compatible with all Windows versions from Vista onwards
- Unlocks Microsoft Word documents that have been created from Word 97 to Word 2019
There are many benefits to using PassFab for Word, but above all; it’s incredibly easy to remove passwords and restrictions on a Word document. After using PassFab, you’ll have full editing access, and the program won’t affect the content either.
You’ll also be happy to know that PassFab offers similar solutions for PowerPoint, Excel, and other Microsoft Office programs.
How to Use PassFab for Word
Follow the guide below if you decide that the best way to Unprotect Word documents is with PassFab for Word. This will explain the quick process of removing Word documents’ passwords.
#1 – Please download and launch PassFab for Word on your computer.
#2 – Then click the “Recover Word Open Password” option.
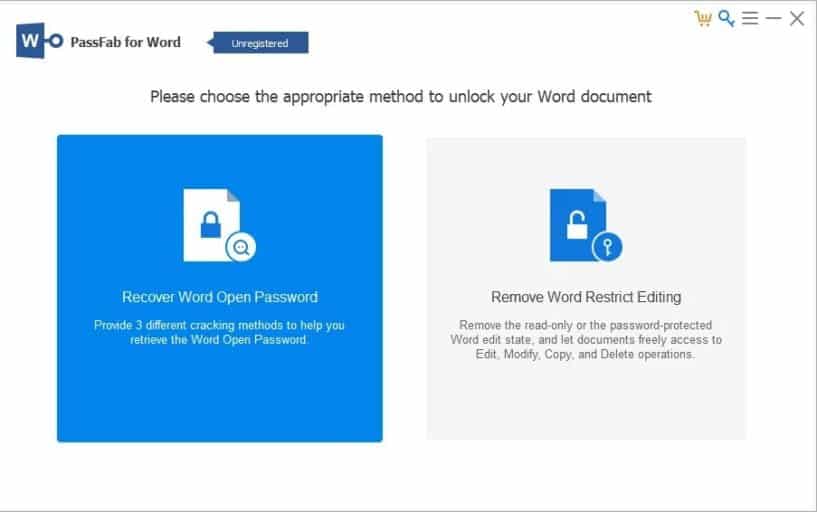
#3 – Now, you should click “Add” to select the Word file you need to retrieve the password. And then select one of the recovery methods to continue.
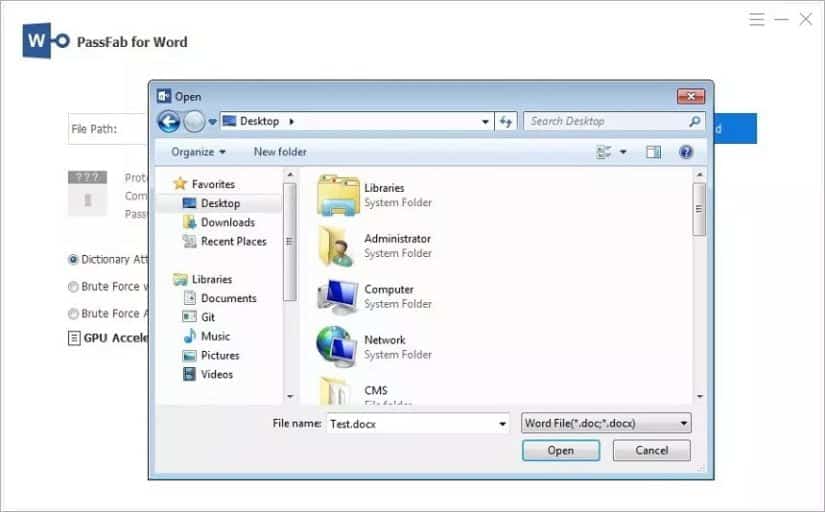
Note: Read each method to decide the most appropriate option, although typically, any method is fine.
Please find below three attack modes PassFab uses to retrieve your password.

Dictionary Attack: Automatically try thousands or millions of possible password combinations in the provided dictionary.
You can also add your dictionary library by clicking the Settings button.

Now, it’s upgrading the dictionary library. This step is necessary. Please wait.

Brute-force with Mask Attack: Suitable for those who still have a vague impression of the password. Users can define the Min/Max password length, frequently used letters and numbers, and special characters to help decrypt accurately.

Brute-force Attack: Run exhaustive matching of every combination of letters, numbers, characters, and symbols. This will take the longest time.
#4 – Please just click the “Start” button.
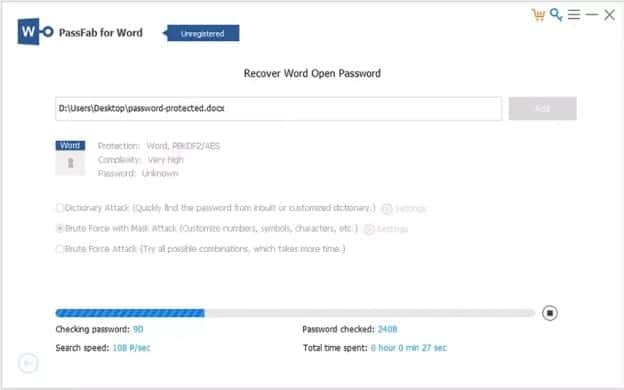
#5 – It takes only a few minutes; you will see the password to open the Word file.

It will take PassFab for Word to crack longer for more complex passwords. That aside, most people set basic passwords on documents. Using this program, you will also be able to get rid of editing restrictions, but we’ll get into that later.
Using Password to Remove Editing Restrictions
Microsoft Word also includes an editing restriction feature. Even though users can read the document without the password, they can’t make changes. Like before, there are two ways of removing this type of password.
If you already know what the password is or you are the creator, follow this guide.
#1 – Open the Word document that has editing restrictions on it and enter the password.
#2 – Tap “File” and click on “Info.”

#3 – Press the “Protect Document” drop-down menu and from the options, click “Restrict Editing.”
#4 – A pop-up window will now appear, and on it, click “Stop Protection.”
#5 – To confirm you want to remove the editing restrictions, you must enter the document’s password. Do this now, then press “OK.”
#6 – Close the Word document, and when you open it up again, you won’t have any restrictions.
This is a quick and easy solution to unprotect Word documents. Of course, the key detail is that you must know what password the document has.
Removing Restrictions with PassFab for Word
Most people don’t know what the password is. For those who fall into this category, you can use PassFab for Word again.
#1 – Unless you already have it on your computer, download and install PassFab for Word.
#2 – Choose the “Remove Word Restrict Editing” feature.
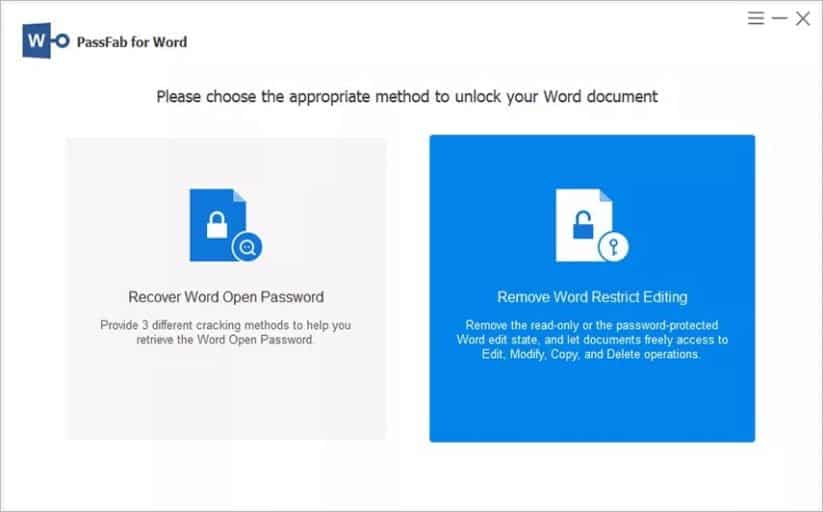
#3 – Click “+” and use the window that appears to select a Word document.


#4 – After selecting a file, click the “Remove” button, and PassFab for Word will remove the editing restrictions within seconds.
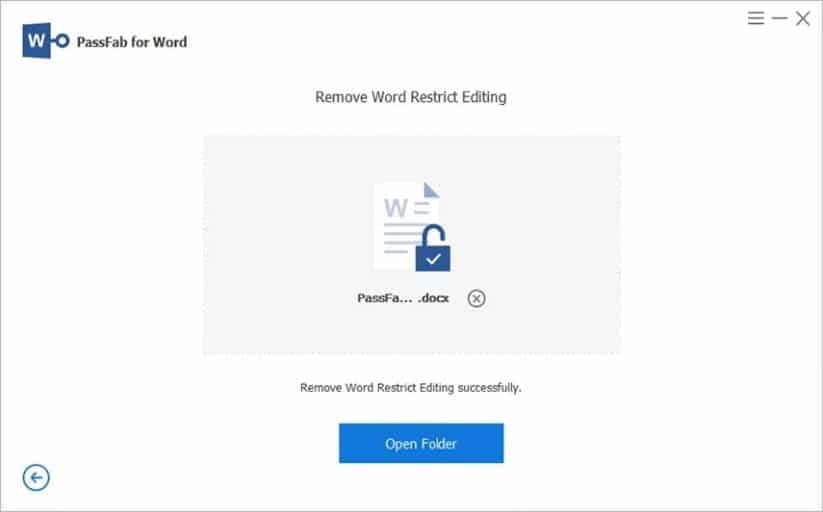
Before long, you’ll have full access to the Word document. Instead of the file being read-only, you’ll have the opportunity to make any changes you want. By the way, here is the best Excel password remover for your reference.
FAQs
Q1: Can I unprotect a Word document without using any third-party tools or services?
A1: Yes, you can unprotect a Word document using the built-in features of Microsoft Word as explained in this article. No third-party tools or services are required for the methods described.
Q2: Will unprotecting a Word document remove all formatting and content?
A2: No, unprotecting a Word document will not affect its formatting or content. It simply removes the password protection, allowing you to access and modify the document as needed.
Q3: Are there any risks involved in unprotecting a Word document without a password?
A3: Unprotecting a Word document without a password does not pose any inherent risks. However, it is essential to ensure that you have the necessary rights and permissions to modify the document in question.
Q4: Can I recover a forgotten password for a Word document using the methods mentioned in this article?
A4: No, the methods mentioned in this article are intended for removing password protection, not recovering forgotten passwords. If you have forgotten the password, you may need to seek professional password recovery services.
Q5: Is it legal to unprotect someone else’s password-protected Word document?
A5: It is important to respect the privacy and ownership rights of others. Unprotecting someone else’s password-protected Word document without their permission may be considered unethical and potentially illegal. Always ensure that you have the necessary rights or seek appropriate authorization before attempting to unprotect a document.
To Conclude
It’s agreeable that Microsoft Office’s password protection features have many benefits, and we can use them in various circumstances.
However, if you forget what password you set or are attempting to access someone else’s file, you’ll have a dilemma on your hands.
At this point, you’ll want to unprotect Word documents, and you can easily do this with our solutions above. PassFab for Word is the top solution, as it can unlock every Word document.
Even the most challenging passwords can be removed, even if it does take a little longer. All in all, removing a password isn’t as difficult as most would think!


