Windows 10 is supposed to run pretty smoothly without much hassle. However, occasional errors can come up with it, just like any other software in the real world.
One of those issues can’t adjust brightness on Windows 10, and many users have experienced it. This issue can particularly appear in the recently upgraded systems to Windows 10.
As a result of this issue, you will not adjust the screen brightness on your Windows PC. In other words, the brightness settings of your computer will not be functional.
What Does “Can’t Adjust Brightness on Windows 10” Actually Mean?
When you adjust the brightness through Windows Settings, nothing can be changed because of this error. When you drag the brightness slider up or down, nothing will be changed, and the brightness will remain the same.
Even if you try to adjust the brightness of your computer through the brightness keys on the keyboard, nothing will happen. But, on the screen, you will see that the brightness level is moving up and down pretty smoothly.
Whatever the cause is, it cannot be very pleasant when you can’t adjust the brightness on Windows 10.
Besides, click here to learn more about E2200 Gigabit Ethernet Controller downloads.
How to Fix Can’t Adjust Brightness on Windows 10?
As a matter of fact, can’t adjust brightness on Windows 10 is a pretty common bug. Many users across the globe have experienced this issue and complained about it. This issue can trigger an incompatible display driver or a corrupted display driver.
However, the good news is that this issue is not very complicated to be resolved. If you are annoyed by this issue and looking for a fix, the fixes are mentioned below. Even if you haven’t experienced the same yet, knowing the solutions in advance would be handy as a preparation.
We present 05 fixes to resolve this issue. We strongly believe that one of those methods will get you out of trouble.
Besides, the Windows 10 keyboard is not working, and the 0x80070020 Windows update error. Here are the best fixes.
01. Update the Display Adapter Drivers
One of the most effective and ‘must-try’ solutions to this issue is updating the display adapter drivers. As we have noticed, the majority of the systems don’t allow users to change brightness due to driver issues. So, updating the drivers should be the solution for most users.
Regarding updating drivers, there are two options in front of you: manual update and automatic update. Needless to say, the manual update requires more effort and time than automatic updates. Also, when you update the drivers manually, there may be a chance to download drives from insecure sources.
Also, manual download can make you install the wrong versions of the drivers, which can do no good. When you have to update many drivers, you are likely to find it pretty difficult and annoying. In that case, the best option would be to use a tool that allows automatic updates.
However, we explain both methods (how to update display adapter drivers manually and automatically) for your reference.
Manual Update
- Launch Device Manager on your computer. To do that, you can simultaneously press the ‘Windows‘ key and ‘R‘ key on the keyboard. Once the ‘Run‘ dialog box appears, you should key in ‘devmgmt.msc.’

- Now that the ‘Device Manager‘ window is opened, you should expand the Display adapters option. Then, right-click on your graphics card (mentioned by its brand name). You will see a popup now, and choose Update Driver from the respective popup menu. Please note that the name of the graphics adapter can vary from one system to another.

- Now, you can click on search automatically for updated driver software. Then, allow the driver to be installed automatically.
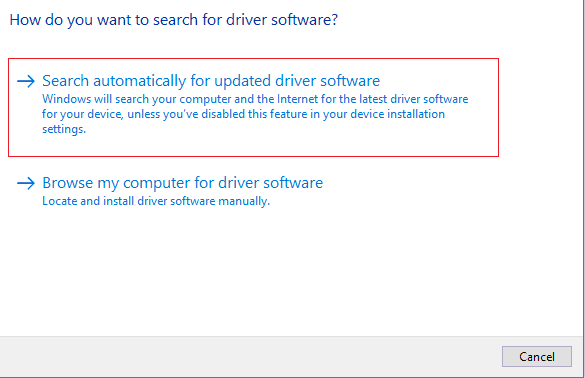
- You can reboot your computer now to see if the respective issue is solved.
- If it doesn’t work, you can again choose the ‘Update Driver‘ option. After that, you can click on ‘Browse my computer for driver software.’
- Then, click on the option ‘Let me pick from a list of device drivers on my computer.’ It is located toward the bottom of the screen.

- You can choose ‘Microsoft Basic Display Adapter‘ in the list that appears now and click on ‘Next.’

- Be patient while it gets installed the display driver from Microsoft. Then, you should reboot the PC so the changes will be saved.
PS: Also, find out how Windows Protected your PC here.
Automatic Update Through ‘Driver Easy’
Here’s the best method if you prefer a more convenient method to update your drivers instead of the manual method. This method can save you plenty of time.
To update drivers automatically, you will have to seek the assistance of Driver Easy. Driver Easy is a professional tool that can help you update all the drivers on your computer.
If you use Driver Easy, you can Update All the drivers with a single click. Nevertheless, if you use the free version of Driver Easy, you can update the drivers. To update all the drivers automatically, you should go for the Pro version of Driver Easy.

Driver Easy will download drivers only from trusted sources, regardless of the version you use. Meaning the drivers you install will be free from malware.
With that said, you can consider using any of the two mentioned above and updating the display driver.
You can proceed to the next solution if none of those two work.
02. Enable Generic PnP Monitor
If updating drivers doesn’t work for you and the issue persists, you should enable Generic PnP Monitor. To do this, you can follow the steps mentioned below.
- Launch the ‘Run‘ dialog box on your computer using the combination ‘Window‘ and ‘R‘ keys. Then, enter the text devmgmt.msc and hit the ‘Enter‘ key on the keyboard. You will now open a window labeled ‘Device Manager.’

- On the ‘Device Manager‘ option, you can find an option called ‘Monitors.’ Expand the monitor and right-click on the ‘Generic PnP Monitor‘ option. After that, you should click on the option called ‘Enable.’
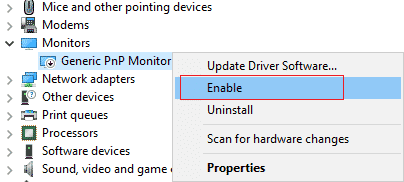
- Now, you should reboot the computer so your changes will be saved. In most cases, this solution will rectify the issue and get the brightness adjustments working again.
03. Update the Driver of the Generic PnP Monitor
If the issue is yet to be resolved, you should try updating the driver of the Generic PnP Monitor.
- To do that, you should first open the Device Manager window. As you already know, you can use Windows and R keys to do that.

- Now, click on Monitors and expand to see the options. Then, perform a right-click on the Generic PnP Monitor option. You can choose Update Driver to update its driver.
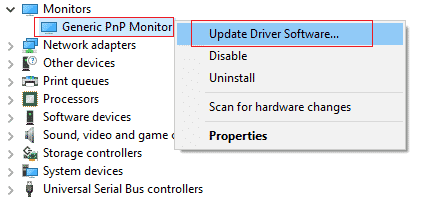
- If not, you can choose the option Browse my computer for driver software. Click on the option Let me pick from a list of device drivers on my computer.
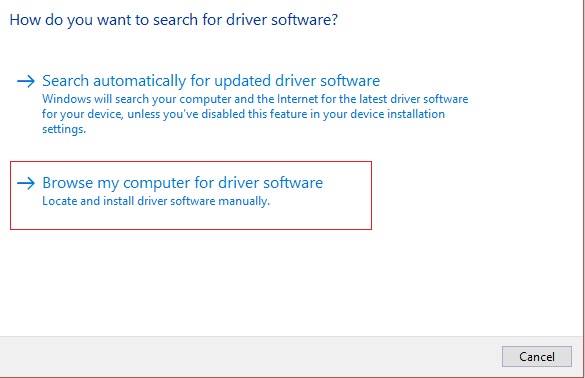
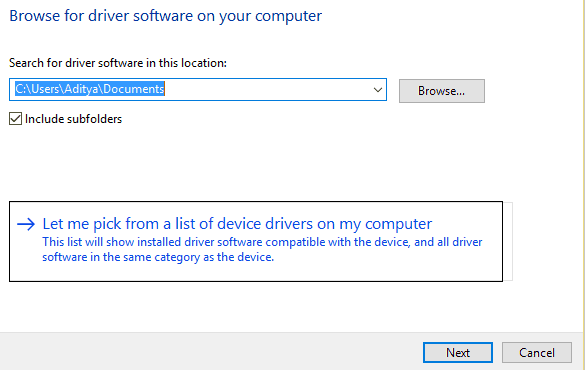
- Choose the Generic PnP Monitor option and choose Next.
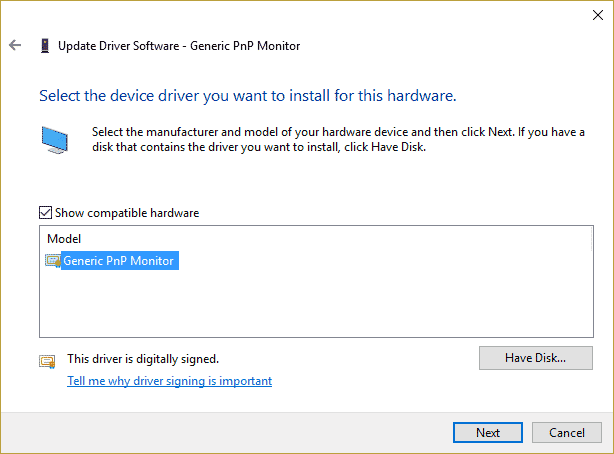
- Reboot the computer so the changes you have made will be saved.
Note: Please note that Generic PnP Monitor too can be updated easily using Driver Easy.
04. Delete if There Are Any Devices Under PnP Monitors
If the previous method doesn’t work, you should delete the devices under PnP Monitors.
- Launch the Device Manager window and go to the View menu.
- Then, choose the option Show Hidden Devices.
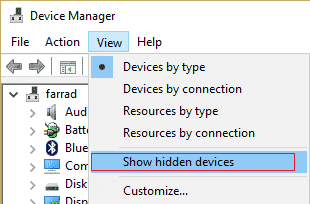
- Now, perform a right-click on every hidden device that comes under Monitors and choose Uninstall Device.
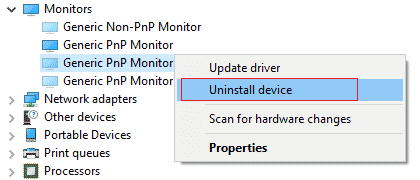
- Repeat the process until you delete all the hidden devices listed under Monitors.
- Reboot to save the changes you have made.
The “can’t adjust brightness on Windows 10” issue might have been fixed.
05. Workaround the Issue
If you are still unable to find a solution, you should work around the issue.
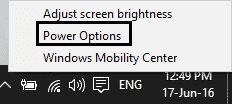
- First, right-click on the Power icon and go to Power Options.
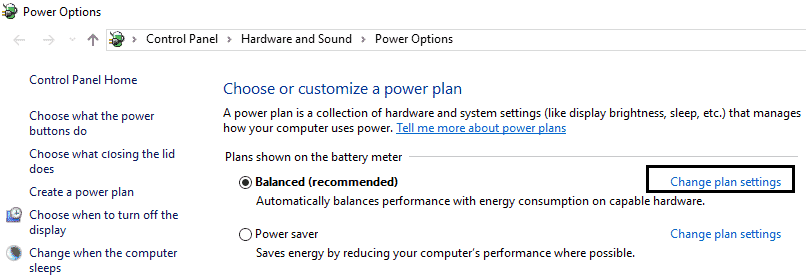
- Click on the option called Change Plan Settings.
- Click on Change Advanced Power Settings.

- Expand the option called ‘Display.’
- Click on Display brightness, Dimmed display brightness, and Enable adaptive brightness.
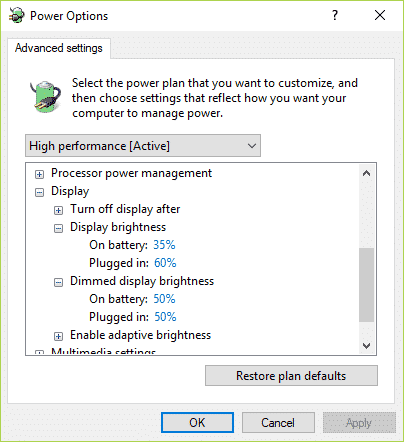
- Change the parameters and click on ‘Apply.’
- Reboot the PC so you can save the changes.
That’s it.
FAQs
Q1. Why can’t I adjust the brightness on my Windows 10 laptop?
There can be various reasons for this issue, including outdated graphics drivers, power settings, adaptive brightness, or hardware problems. Try the troubleshooting methods mentioned in this article to resolve the problem.
Q2. How do I update my graphics driver on Windows 10?
To update your graphics driver, right-click on the Start button, select “Device Manager,” expand the “Display adapters” section, right-click on your graphics card, and choose “Update driver.” Windows will search for the latest driver version and install it if available.
Q3. What is adaptive brightness in Windows 10?
Adaptive brightness is a feature in Windows 10 that automatically adjusts the screen brightness based on the ambient lighting conditions. However, it can interfere with manual adjustments. You can disable it through the power options settings.
Q4. Can third-party software help in adjusting brightness on Windows 10?
Yes, there are third-party software options available that offer additional features and fine-tuning of display settings. Research and choose a reliable software solution that suits your needs.
Q5. What should I do if the brightness control problem persists?
If the brightness control problem persists even after trying the troubleshooting methods, there might be an underlying hardware issue. Contact a professional technician or your device manufacturer for further assistance.
Conclusion
Being unable to adjust brightness on Windows 10 can be frustrating, but there are several potential solutions to resolve the issue. Start with the basic troubleshooting steps, such as updating the graphics driver, adjusting power options, and disabling adaptive brightness.
If these methods don’t work, consider calibrating display color or using third-party software. In rare cases, hardware problems might be the cause, requiring professional assistance. By following these steps, you should regain control over the brightness settings on your Windows 10 device.


