In this stepwise guide, we will talk about the stepwise process for converting bare-metal, physical Windows Server to a VM.
Here, we will perform hot cloning remotely, virtualizing switched on physical machines. Also, we will show our readers some problems they can face while performing this task.
So, you will even find various solutions to fix these annoying issues. Before we move further with the stepwise guide, you will know about certain aspects of VMware P2V conversion.
So, let’s begin without further ado!
PS: Here, you will learn more about the VMware vSphere Hypervisor, and a full guide on VMware vCenter Converter.
Part 1: Why do you need to go with P2V?
Firstly, users need to know that P2V stands for ‘Physical to Virtual.’ This kind of conversion duplicates the applications, data, and operating system from a current physical server to a virtual server.
Here, virtualization dramatically enables users to reduce their server room necessities by segmenting the legacy hardware. A virtual machine makes a sys admin’s work easier and is hardware agnostic. It makes disaster recovery and backups more reliable and easier.
If you encounter any hardware catastrophe, you get the virtual machine running on different hardware pieces with negligible or zero downtime.
On the other hand, fewer data center space, lesser power consumption, and less hardware for repairing and maintaining – all these things reduce costs dramatically. So, it is time you should go with VMware P2V conversion!
Part 2: What do you require?
You need certain things before going with the VMware P2V conversion. So, let’s have a look at the things you need.
1. Physical machine
First of all, users will need a physical machine, which they would like to adapt to a virtual machine. It could be any bare-metal, physical Windows Server that they like to virtualize.
2. Virtual Infrastructure
Secondly, users need a VMware infrastructure, such as VMware vSphere Hypervisor (ESXi 6.0). They have to install this software on their machines. This program is available for free and can be downloaded from the official website of VMware.
All they need to do is to register on the website by creating a VMware account. It is recommended to install the recent version available.
3. VMware vCenter Converter
Users can go with VMware vCenter Converter Standalone, which is a no-cost tool for converting physical and virtual servers to VMware VMs. One can download this amazing program from the VMware official website.
With this program also, you have to install the latest VMware P2V vCenter Converter version.
Before you commence with VMware P2V conversion, you must keep certain significant points in mind. These important points are as follows:
- VMware P2V features a downtime that lasts for several minutes. So, it is best to inform the users prior to making the conversion.
- One should employ synchronization. (Know about this point later on in the step-by-step guide)
- Before synchronizing, you must stop all the important services.
- Synchronization always takes place at the conversion procedure’s end.
- Make usage of scheduled synchronization.
- Ensure you don’t choose ‘Perform Final Synchronization’ when asked in this stepwise guide for VMware P2V conversion.
- One’s downtime must be coarsely the synchronization’s duration.
Part 3: How to perform VMware P2V Conversion
In this guide, you will learn how to perform VMware P2V conversion step by step. It is easier to carry out VMware P2V conversion using VMware vCenter Converter.
So, let’s look at some simple steps to perform this complex task.
Step 1: Install VMware vCenter Converter
Firstly, users need to download and install VMware vCenter Converter Standalone on their workstations, which are connected to their network. Here, it is not necessary to download this program on the server that you want to migrate.
So, install this program on any system that is linked to that network. After installing this VMware P2V converter, launch the same.

Step 2: Tap on ‘Convert Machine’
Next, users have to choose the ‘Convert Machine’ option from the home interface.

Step 3: Choose ‘Powered-on Machine’
Here, we are migrating switched-on physical machines, so choose ‘Powered-on Machine’ in the section ‘Select Source Type.’ If you have installed VMware vCenter Converter on another server than the server you would like to migrate, choose ‘A Remote Machine.’
After this, put in the name or IP address for the physical server. Then, enter your user ID and password for connecting to the physical server. Here, the username will be in the format as domain\username, or it could be as username@domain.
Employ an account that features all administrator rights on your remote system. If you are using a Windows physical machine, you need to choose the operating system family as ‘Windows.’ Once done, hit ‘Next.’

Step 4: Install the agent
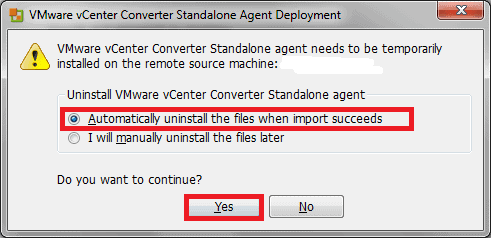
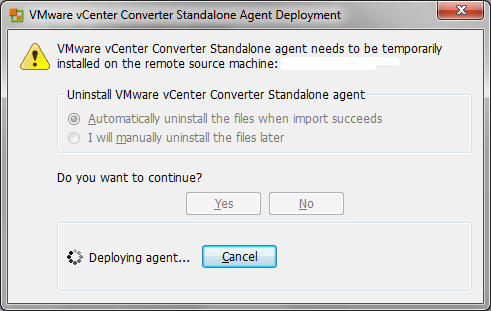
VMware vCenter Converter requires installing an agent on the physical server momentarily. The program will install it automatically. After carrying out a successful migration, users can agree to remove the agent automatically.
On coming up of a dialog box, choose ‘Automatically uninstall the files when import succeeds.’ Then, tap on ‘Yes’ and wait for the program to deploy this manager.
Step 5: Resolve the issue
Users who do not face any error can move on to Step 6. If you come across an error such as “Error 1219: Multiple connections to a server or shared resource by the same user, using more than one user name, are not allowed” or “Unable to complete Converter agent installation on . . .”, then you have to fix it. To fix this problem, go through the following steps.

- Disconnect all the network drives from the current system to the server. For this, navigate to ‘This PC/My Computer’ and look for charted network drives to the server. On finding one, you need to disconnect them.
- Next, log into your physical machine and disconnect remote drives, if any. For this, run a command as ‘net use\\*/delete‘ in the command prompt tab.
- Close all applications that have a connection with the server.
- Now, close every Windows Explorer window featuring files from the server.
- Even close all the server’s Microsoft Management Console (MMC) snap-ins on that server you try to convert.
After going through the above steps, you need to repeat the steps from 2-5. If you encounter any error again, reboot your system where you have installed VMware P2VvCenter Converter.
Step 6: Communicate with the setup
VMware P2V vCenter Converter will be successfully connected to the physical server. So, communicate with the setup of VMware now.
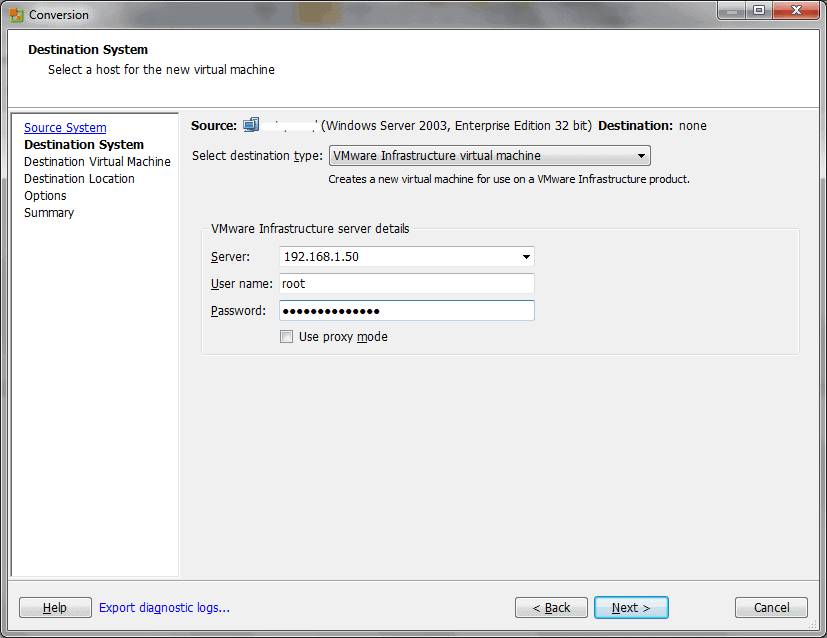
If you have the VMware vSphere Hypervisor ESXi 6.0 host, you will convert your physical machine to a virtual machine running on that ESXi host.
Next, select the ‘VMware Infrastructure virtual machine’ option from the list ‘Select Destination Type.’ Here, ESXi is the VMware environment or infrastructure; that’s why you must select this option.
Now, put your server’s IP address under the ‘Server’ tab. Also, enter your User ID and Password. Users who like to pass their data traffic through their PC having the VMware P2VConverter can select the box ‘Use Proxy Mode.’ If you do not want to, leave the tab ‘Use Proxy Mode’ unchecked and hit ‘Next.’
Step 7: Tap on ‘Next’
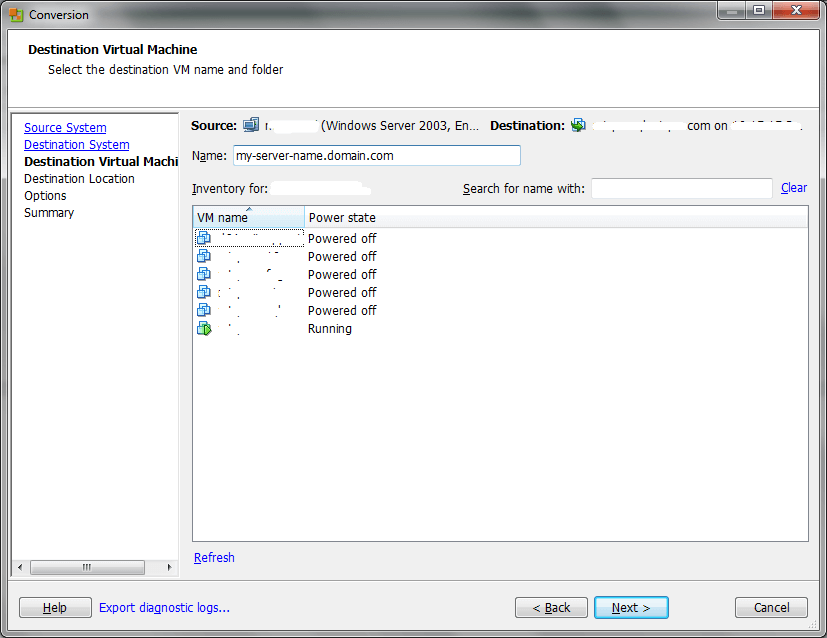
The system has connected to the ESXi server now. Provide the name that you like for the virtual machine. Once done, select the ‘Next’ option.
Step 8: Select the location
Now, select the destination place for the virtual machine on the page ‘Destination Location.’ Here, users can even specify their virtual machine’s version. You can choose the latest version available.
However, choosing the latest version is not always a great idea. Choose a version depending on your compatibility requirements and existing environment.
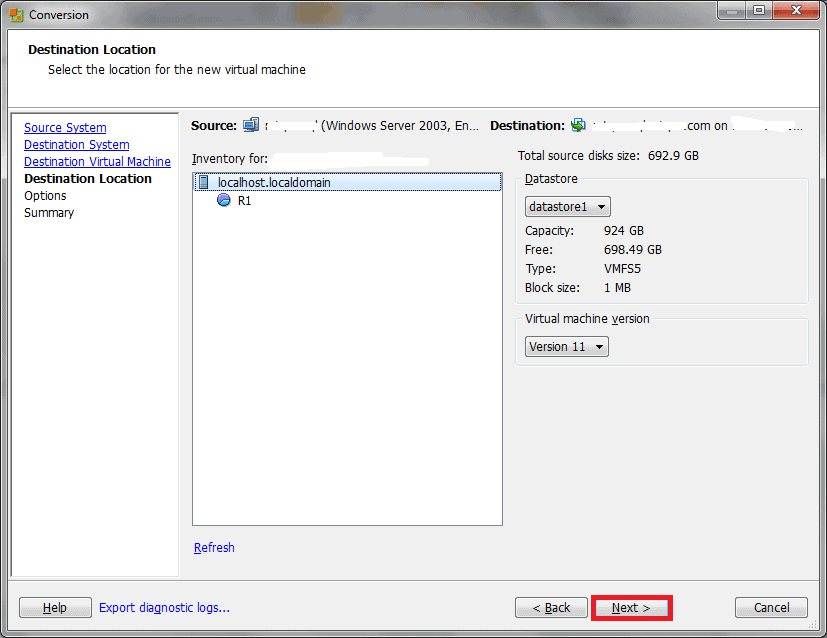
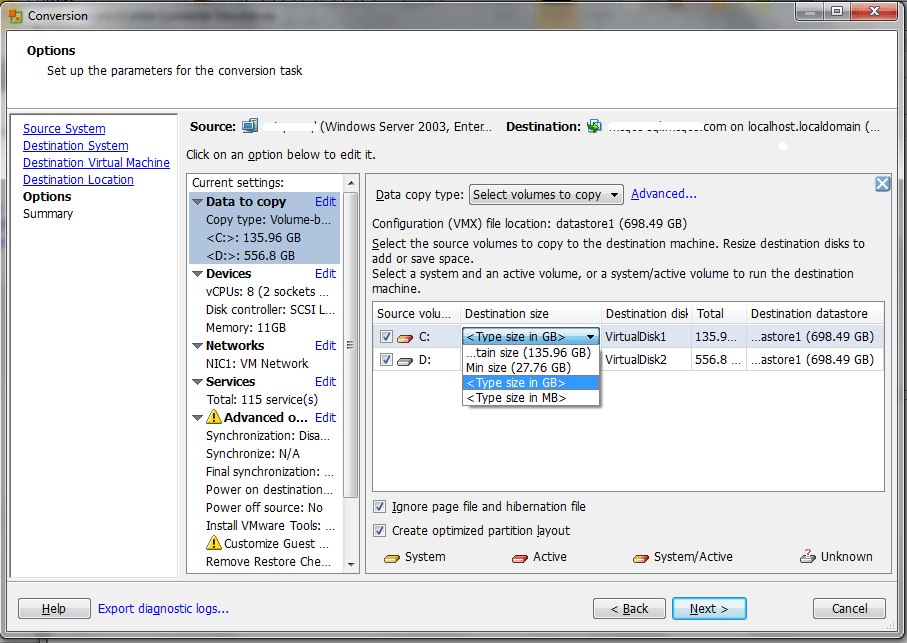
Step 9: Specify your options
At this point, users will specify the ‘Options’ they like for their new virtual machine. They can modify settings for CPUs, RAM, recent drives, and so on. You can even leave all things as default if you prefer. Otherwise, make changes in settings like synchronization options, disk sizes, etc.
Note: If users modify the drive’s sizes, they will not be allowed to switch on Synchronization. So, don’t change the size and leave it as default.
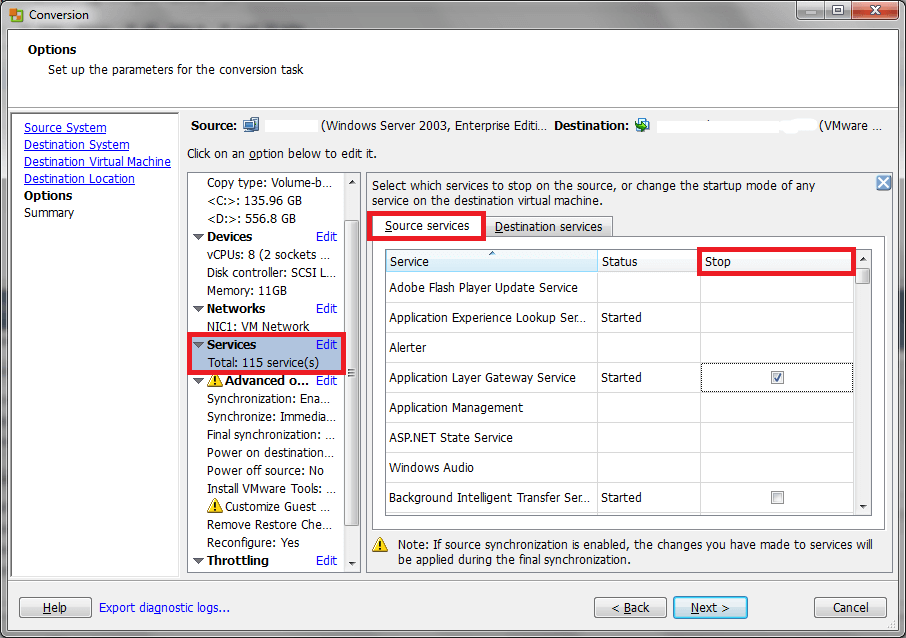
Stop services that run on your source machine – Users have to ensure that they don’t lose information from services that run on their source machine.
One can choose the services one likes to halt before VMware P2V Converter Standalone coordinates data between the destination and source machines.
Thus, the services don’t produce data while destination and source machines are coordinated.
Choose ‘Services’ and then select the tab ‘Source Services.’ For stopping a service before synchronization on your source machine, highlight that service and click the checkbox against ‘Stop.’
After that, users can postulate synchronization options.
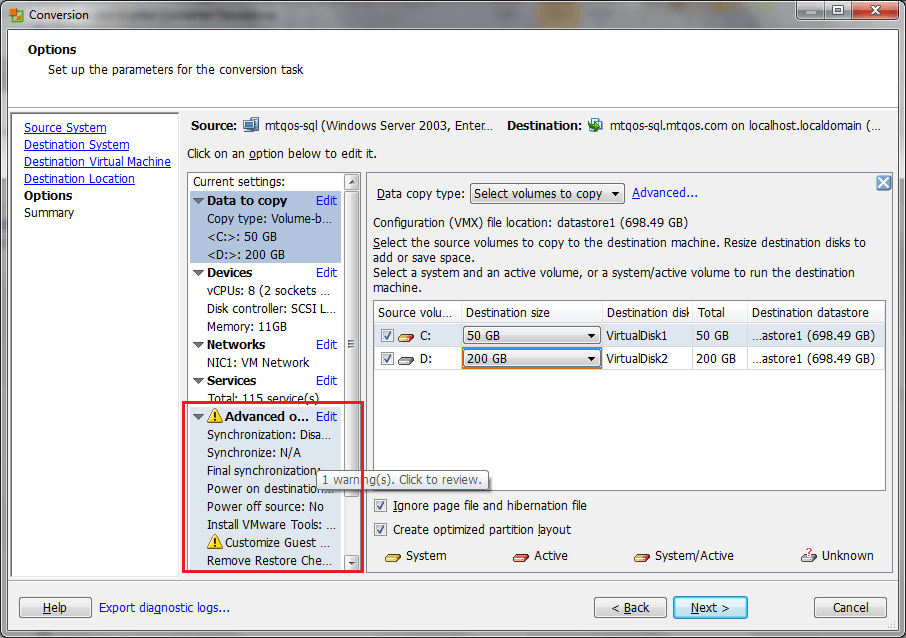
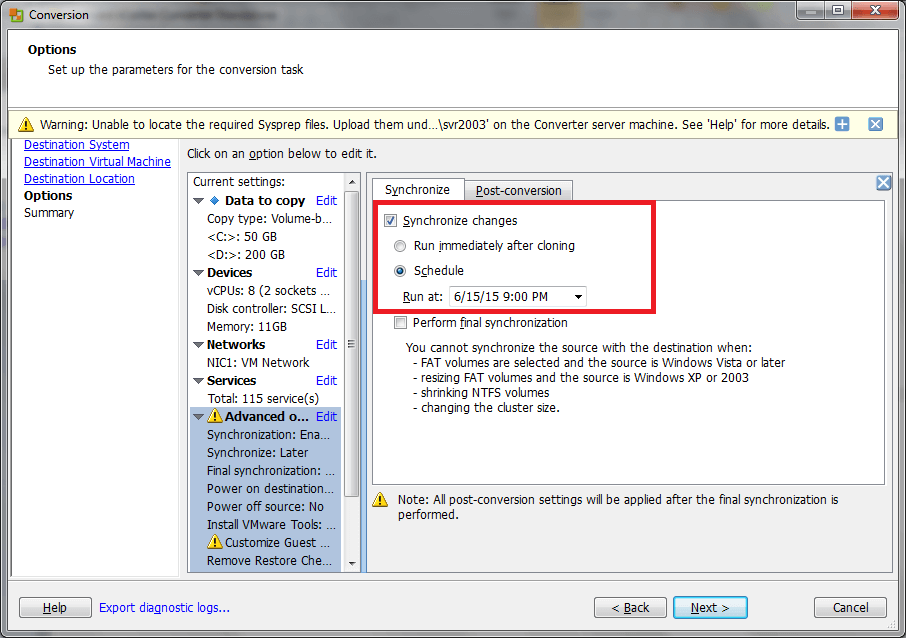
such as post-conversion tabs under the tab ‘Post-conversion’ and select ‘Install VMware Tools on the destination virtual machine.’ Once done, tap on ‘Next.’

Step 10: Tap on ‘Finish’
After reviewing the summary, ensure everything is fine, and tap on ‘Finish.’

Step 11: Examine the status
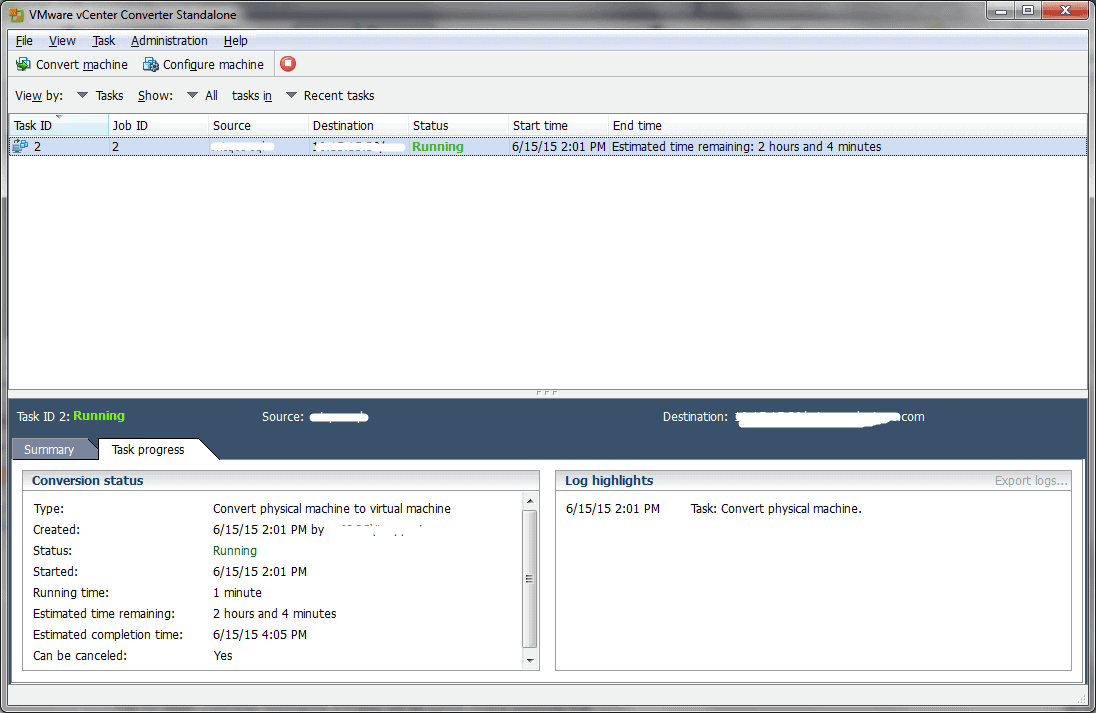
Now, users will see that the procedure has been given and will now be in the ‘Running’ status, which is going to take a few hours.
Step 12: Fix errors
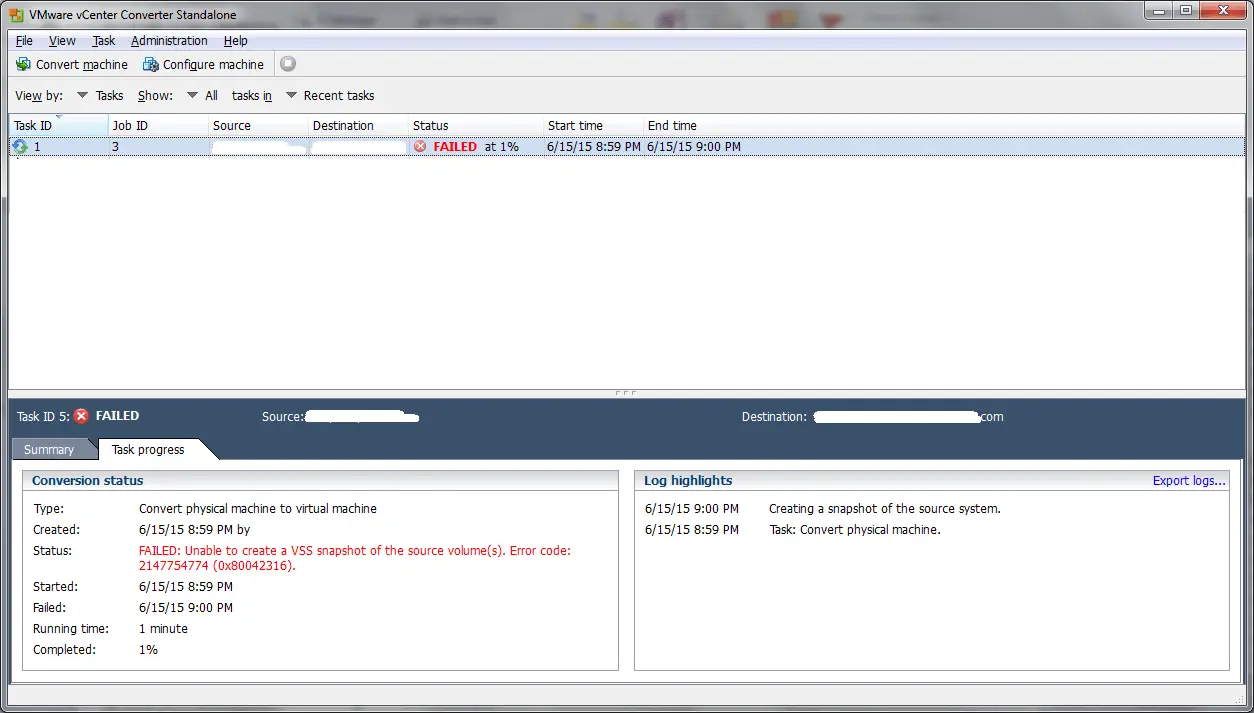
Once the preliminary cloning finishes, you might receive an error throughout Synchronization. If users do not face any errors, skip to the next step.
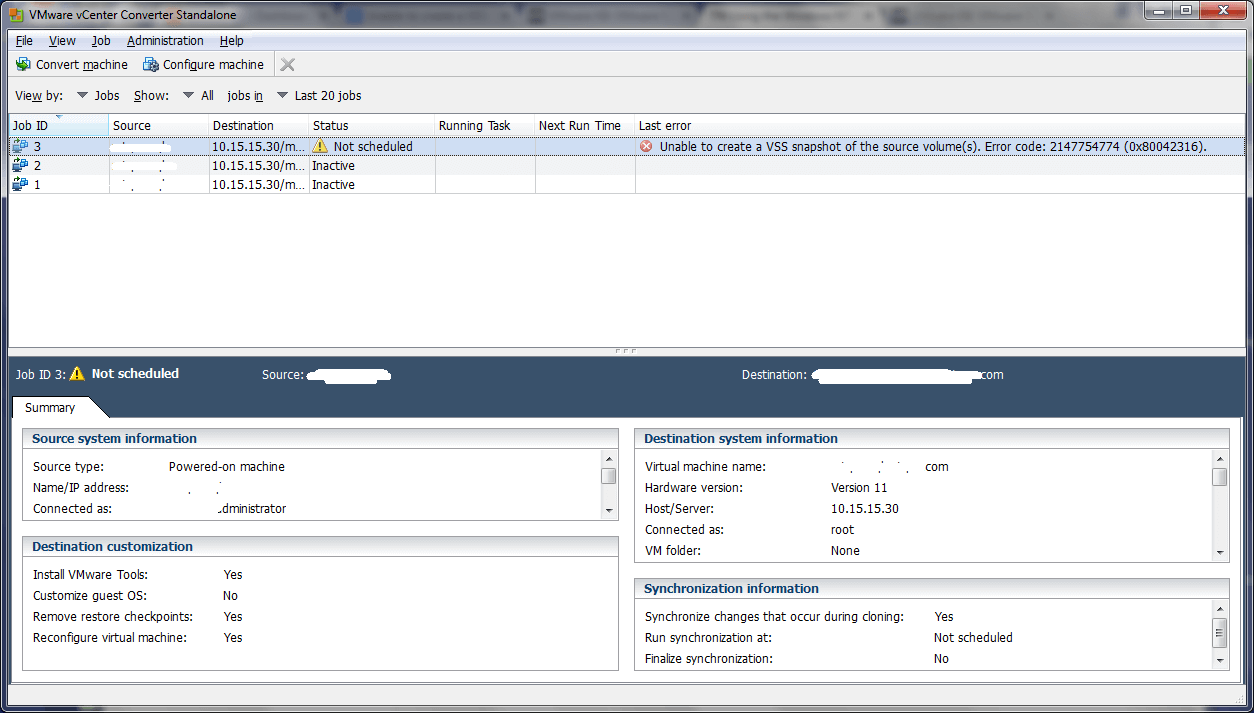
If you come across an error like “Failed: Unable to create a VSS snapshot of the source volume(s). Error code: 2147754774 (0x80042316).”
This kind of error occurs when various providers are linked to the same operating system. You will find a solution for resolving these errors in the following steps.
Step 13: Enter “vssadmin list providers”
After logging into the physical server, run cmd.exe, enter vssadmin list providers, and press Enter.
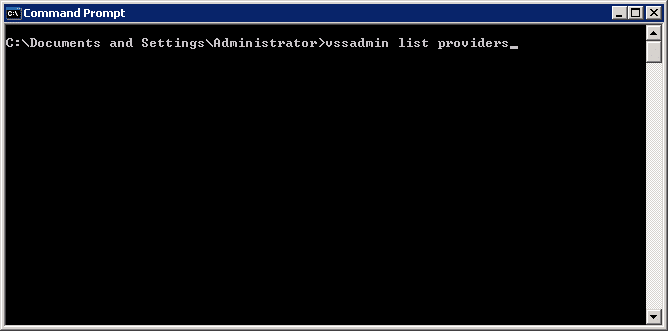

If two providers are linked to VSS, you need to eliminate one. Once the harmonization is done, you can add the removed provider to VSS.
Step 14: Press ‘Enter’
To remove this VSS provider, you require editing the registry. Under the cmd tab, enter ‘regedit‘ and press Enter.

Next, go to ‘HKEY_LOCAL_MACHINE\SYSTEM\CurrentControlSet\Services\VSS\Providers.’ Users will come across two providers.

Now, choose a non-Microsoft provider and tap on ‘Export’ after right-clicking on it.
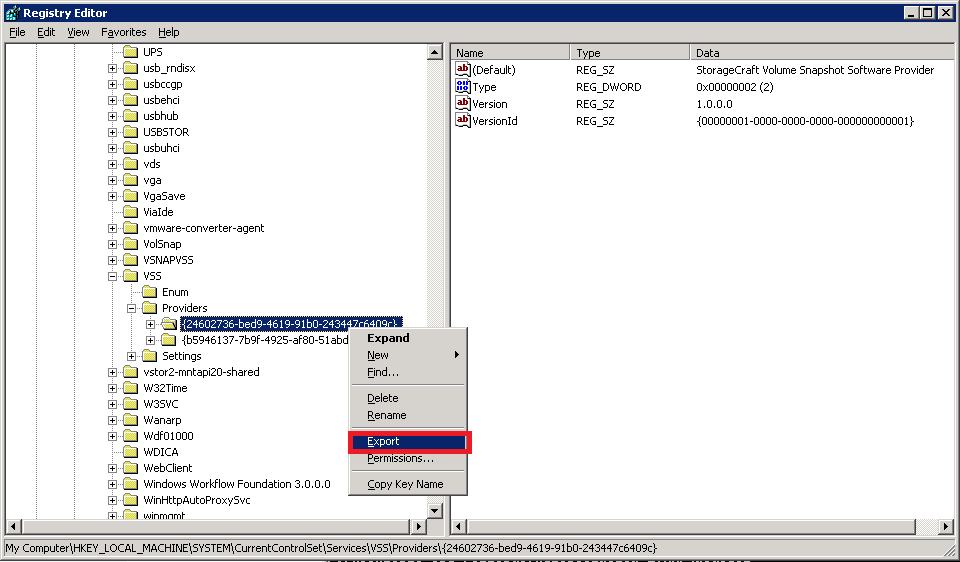
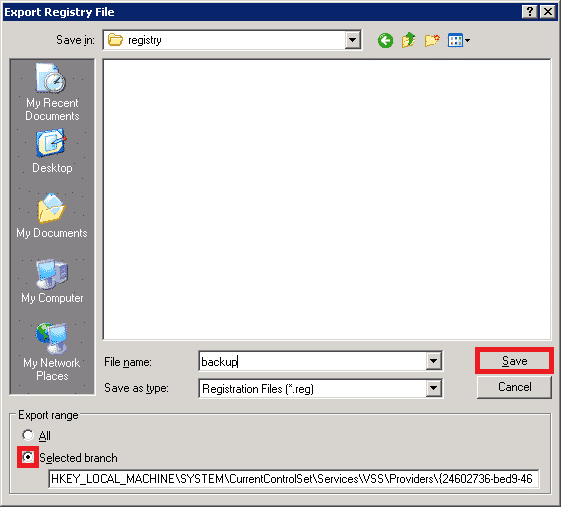
Save the registry tab in a secure location and enter a filename. Next, select the ‘Selected branch’ button and tap on ‘Save.’ Save the .reg file carefully and restore the deleted registry access by tapping on that .reg file.
After you have exported the tab, right-tap on the key and choose ‘Delete.’
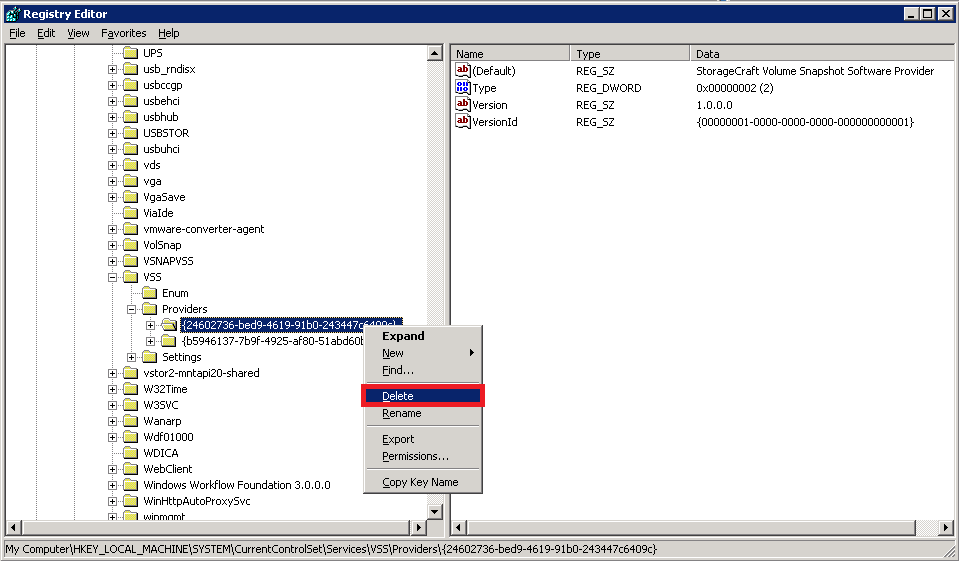
Next, choose ‘Yes’ and reboot the physical server now.

Step 15: Choose ‘Synchronize’
After the server reboots, you need to right-tap the failed function and choose ‘Synchronize.’
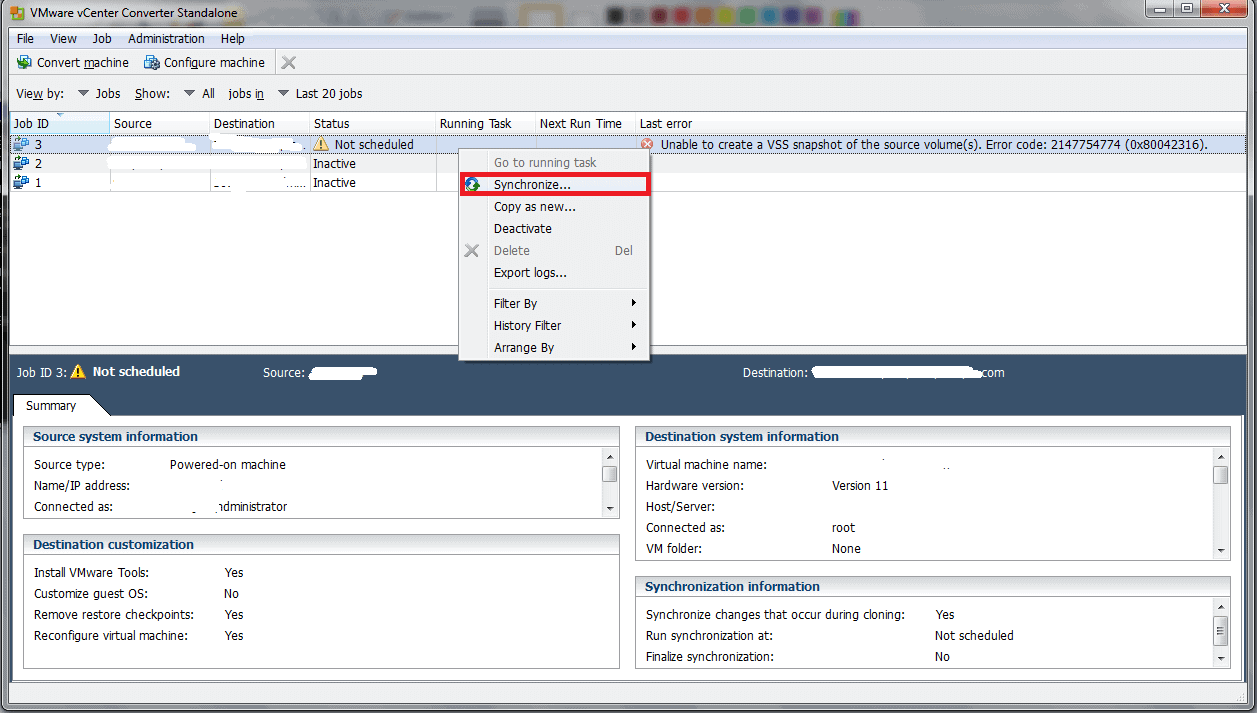
If you like to schedule or run it instantly, modify the Settings within the Advanced Options tab. Then, tap on ‘Next’ and ‘Finish.’


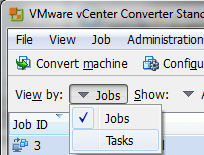
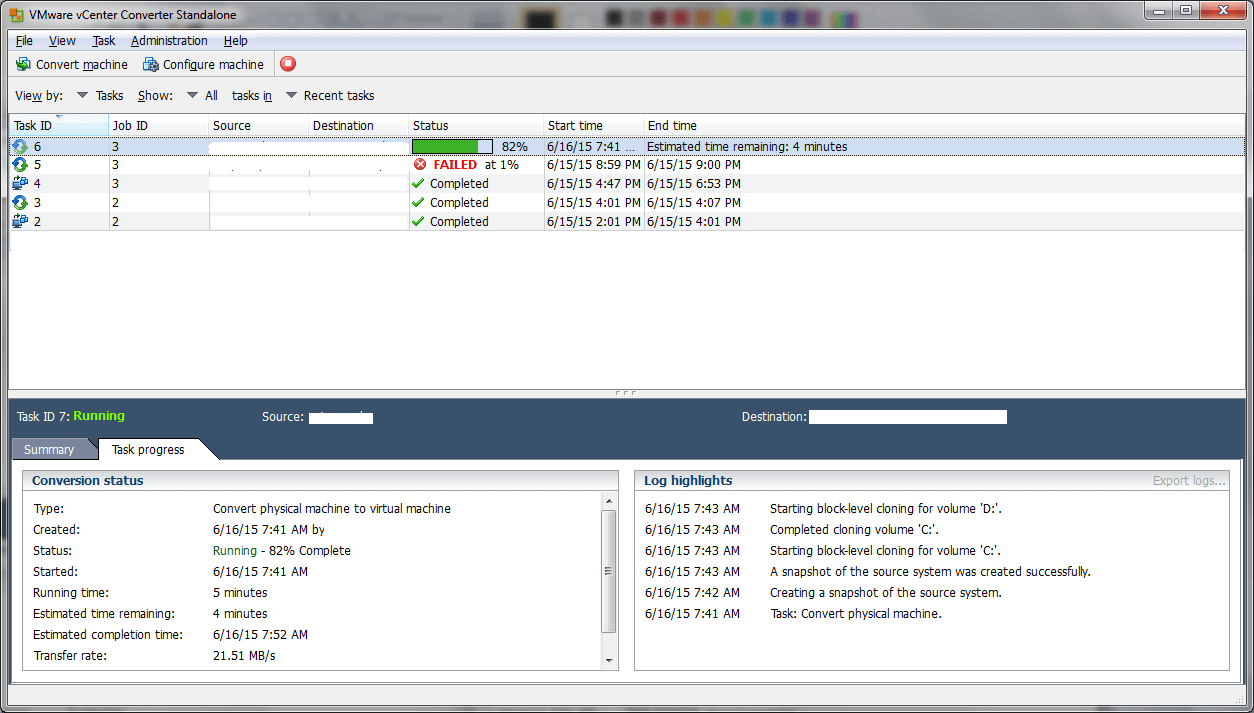
The synchronization task will begin, and to see individual operations, choose ‘Tasks’ from the dropdown ‘View by.’

Step 16: VM is ready
Now, synchronization is done, and your virtual machine must be ready.

After this, log into the vSphere (ESXi) server.

You will find that your virtual machine has come upon the record here.

Step 17: Select Edit Settings
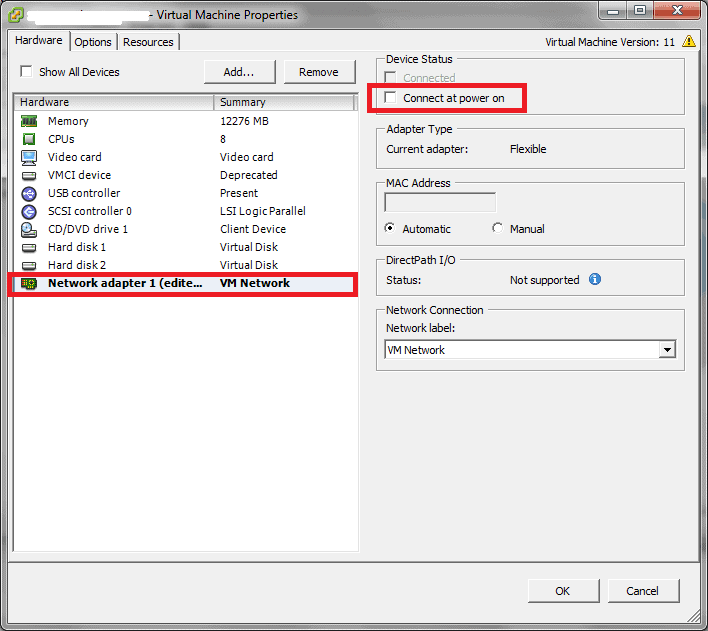
However, you should not power on the virtual machine yet. Right-tap on that VM and select ‘Edit Settings.’

Under the tab ‘Hardware,’ select ‘Network Adapter’ and turn off the toggle against ‘Connect at power on.’ It is going to prevent conflicts in the current physical server and network.
Step 18: Start the machine
Now, you can start the virtual machine. The system will boot up if everything goes well. Examine any absent driver and see if all things are operational. After this, one can proceed by turning off the physical server while you’re not connected.
Switch off the virtual machine and visit ‘Settings.’ Now, connect to the network adapter and turn on the virtual machine.
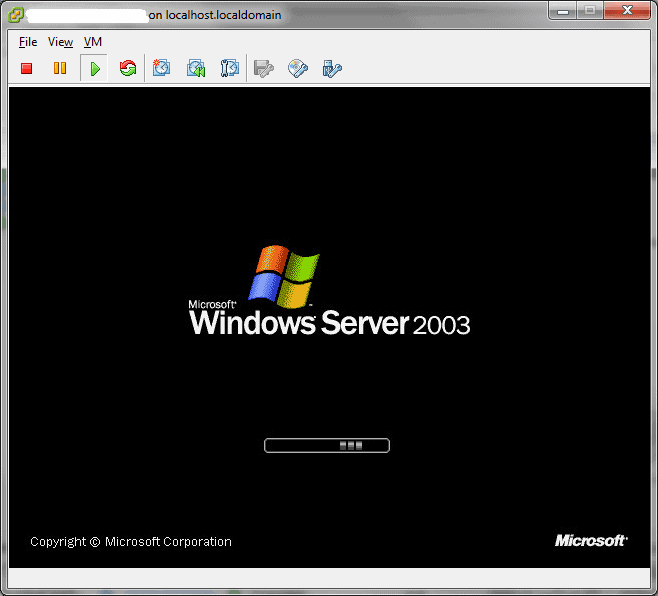
Ensure that the physical machine is turned off before you switch on the virtual machine, along with the network card associated. Modify the VM’s IP address to one of the physical ones.

Step 19: Tap on ‘Yes’
If you have faced an error, as mentioned in Step 12, you need to perform this step. Else, you can skip to the next step.
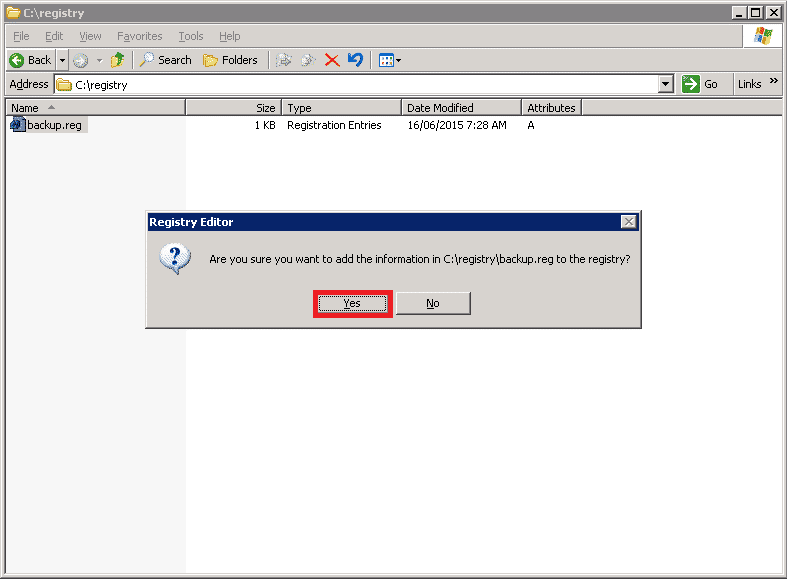
In the virtual machine, go to the site where you have saved the exported .reg file. Next, double-tap on it and select ‘Yes’ when asked to add details to the archive.
Step 20: Test your applications
Lastly, move ahead and examine all of your apps. Now, you have migrated your physical server to the virtual machine carefully.
FAQs
Q: Can I perform a P2V conversion on any operating system? A: VMware P2V supports a wide range of operating systems, including various versions of Windows, Linux, and Unix. However, it is essential to check the compatibility of the specific operating system with the target virtualization platform.
Q: What are the prerequisites for a successful P2V conversion? A: Prerequisites for a successful P2V conversion include assessing the source system’s compatibility, proper planning and testing, and ensuring hardware compatibility between the physical system and the target virtualization platform.
Q: Is VMware Converter a free tool? A: Yes, VMware Converter is available as a free tool from VMware. However, there are additional enterprise versions and features available for a fee.
Q: How long does a typical P2V conversion take? A: The duration of a P2V conversion depends on various factors, such as the size of the source system and the network speed. Smaller systems may take a few hours, while larger systems can take several hours or even days.
Q: Can I reverse a P2V conversion if needed? A: While reversing a P2V conversion is technically possible, it can be complex and time-consuming. It is recommended to have proper backups and thoroughly assess the need for reversing a conversion before proceeding.
Conclusion
VMware P2V is a valuable tool for businesses seeking to migrate their physical servers or workstations into virtual machines. It offers cost savings, increased efficiency, and easy management. By following best practices and addressing common challenges, organizations can successfully convert their physical systems into virtual machines and unlock the benefits of virtualization.


