
USB debugging is an essential tool for Android power users and developers. It allows you to access advanced software features, troubleshoot issues, and test apps on your Samsung Galaxy device.
While it may sound intimidating, enabling USB debugging is simple on modern Samsung phones like the S7, S6, J7, and others. This guide will walk you through the entire process step-by-step.
What is USB Debugging?
USB debugging establishes a connection between your Android device and a computer. It allows the computer to communicate directly with your phone, providing full access to the Android software system.
With USB debugging enabled, you can:
- Install custom software and OS builds
- Access advanced developer settings
- Troubleshoot performance issues
- Test unreleased apps
- Modify the interface and firmware
Developers heavily rely on USB debugging to build and optimize Android apps. But even casual users can benefit from the expanded functionality.
Just be aware that it does pose security risks if misused. You should only enable debugging when needed and disable it after.
Preparing to Enable USB Debugging
Before you can enable USB debugging, you need to do some prep on your computer and phone:
Install Device Drivers
Your computer needs the proper drivers installed to interface with an Android device. Download and install the official Samsung USB drivers for your phone model and operating system.
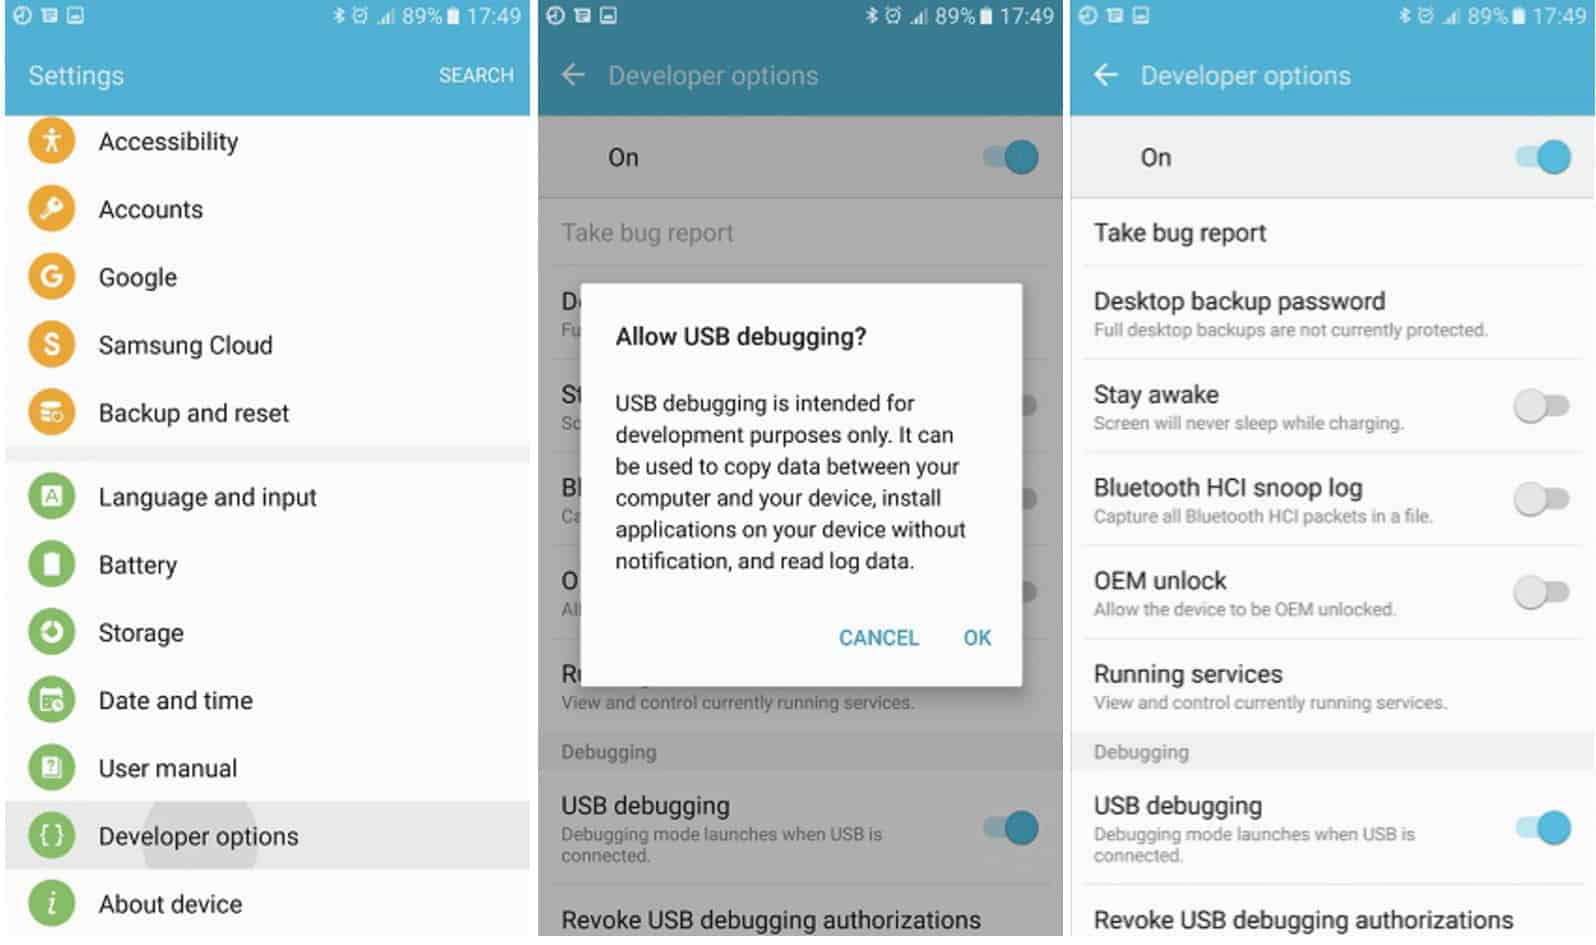
Enable Developer Options
Developer options contain the USB debugging toggle. To access them:

- Open Settings > About Device
- Tap Build Number 7 times
- Return to Settings – you’ll now see Developer Options
Connect with a USB Cable
Use the charging cable that came with your Samsung phone. Connect it to a USB port on your computer.
Enabling USB Debugging on Samsung Phones
With your setup complete, you can now enable USB debugging in a few quick steps:
For Galaxy S7, S8, S8+, and S7 Edge
- Open Developer Options in Settings
- Check the box for USB Debugging
- Tap OK on the Allow USB Debugging prompt
That’s it! USB debugging is now active on your Galaxy S7, S8, S8+, or S7 Edge.
For Galaxy S6, S6 Edge, and S5
- In Developer Options, select USB Debugging
- Confirm the Allow USB Debugging prompt
You have successfully enabled USB debugging on your Galaxy S6, S6 Edge, or S5.
For Galaxy Note 5, Note 4, and Note 3
- Go to Settings > Developer Options
- Toggle USB Debugging to the “on” position
- Allow debugging when prompted
Your Galaxy Note 5, Note 4, or Note 3 now has active USB debugging mode.
For Galaxy J7, J2, J5, and J3
- Access Developer Options in Settings
- Locate and enable USB Debugging
- Accept the Allow USB Debugging prompt
That takes care of enabling the feature on your J Series Samsung device.
Using USB Debugging on Your Phone
With USB debugging enabled, you can now connect your phone to a computer and take advantage of the expanded functionality.
Some of the things you can do include:
- View log data to diagnose issues
- Install APK file packages
- Modify interface elements and themes
- Backup or restore custom ROMs
- Access the Android shell with ADB commands
- Stream your device screen to your computer
- Migrate data between devices
- Reset your phone to factory condition
The possibilities are endless for developers and power users alike! Just make sure to disable USB debugging if you ever need to send your phone in for repairs.
Disabling USB Debugging
To turn off USB debugging when you’re done using it, simply:
- Go back to Developer Options
- Uncheck the USB Debugging option
Debugging will immediately be disabled.
Key Takeaways
- USB debugging creates a bridge between your Samsung device and a computer
- It provides full access to the Android OS for development purposes
- You must enable Developer Options to activate USB debugging
- The process differs slightly depending on your Samsung Galaxy model
- With debugging enabled, you can mod software, troubleshoot, test apps, and more
- Make sure to disable it after use for security purposes
Beside, learn more about how to format android phone.
Frequently Asked Questions
Q: Is enabling USB debugging safe on my Samsung phone?
A: The process itself is safe, but it gives you powerful system access that could be misused if you aren’t cautious. Only enable it when needed and disable after.
Q: Will USB debugging work on non-Samsung Android devices?
A: Yes, most Android devices have the USB debugging option in Developer Options. The toggle location may vary between brands.
Q: Can I enable USB debugging wirelessly or without a cable?
A: A few advanced methods allow wireless debugging, but they still require an initial USB connection for setup.
Q: What are the risks if I leave USB debugging enabled?
A: You are more vulnerable to malware and unauthorized access to your device if USB debugging remains on. Only enable it temporarily when you need it.
Q: Does USB debugging drain my phone’s battery life?
A: There is a slight increase in power drain, but it’s negligible over short debugging sessions. Extended use may impact battery life more noticeably.
Q: Can I damage my phone if I modify settings with USB debugging?
A: There is a risk of software issues or even device bricking if you edit critical settings carelessly. Make backups and proceed carefully.
Q: Do I need any special software to use USB debugging?
A: The Android SDK or development tools like Android Studio allow for more advanced debugging features. But for basic use, no software is required.
Q: What does “Allow USB Debugging” mean when I connect my phone?
A: This prompt asks your permission to enable a USB debugging connection from that specific computer. Always verify the Allow prompt before proceeding.
Q: I don’t see the Developer Options menu on my Samsung device. Why not?
A: You first need to enable Developer Options by tapping Build Number 7 times in About Device. This unlocks the advanced menus.
Conclusion
USB debugging unlocks powerful capabilities that were once only accessible to Android developers. With some quick toggles in your settings, any Samsung user can enable USB debugging for modding, software development, and troubleshooting.
Just remember to use it responsibly and disable it when not needed. Your phone’s digital life depends on it!


