
For various reasons, we tend to have several videos saved on our computers or portable storage devices. However, we don’t need those videos in their lengths in most cases.
In other words, most of the videos saved might have unwanted (or not too useful) parts. For instance, assume you have a 4-hour tutorial and only need the last 45 minutes. If the respective video is saved in HD, it might take up considerable space.
When the number of videos adds together, your hard disk space will start to run out. So, it is a matter of deciding whether you need to have those full-length videos or not.
In that case, you should find a way to cut, split, or trim the respective video file. That is exactly when you will need the assistance of software that can trim MP4 videos.
You might also need to trim MP4 videos to create various videos for different purposes. It might be for recreational purposes, education, entertainment, or anything else. In a nutshell, we don’t need the entire video length in many cases.
This article will explain how to trim the MP4 file using the professional tool called Wondershare Filmora.
PS: here, you will learn more about how to convert MP4 To WAV.
Part 1: How to use Wondershare Filmora to Trim MP4 Video Clips
Wondershare Filmora is one of the best tools to trim MP4 videos precisely and conveniently. Wondershare Filmora has plenty of features and tools to make video editing a very convenient task.
Thanks to the user-friendliness of this convenient software, it can be used even by a novice user very easily. Mentioned below are some of the key features associated with this tool.
Besides, read more about the completed Movavi Video Editor Review here.
- Exceptionally convenient user interface that makes video editing incredibly easy.
- It allows you to trim MP4 with a one-click operation.
- Filmora doesn’t cause any quality loss when trimming videos.
- It can also increase the quality of the videos without any hassle, even if you are a beginner.
- It can add various effects, intros, credits, transitions, filters, etc.
- Filmora can save videos in various formats to match your requirements precisely.
- It can burn output videos into DVDs directly or upload them to video-sharing websites straightaway.
- It is compatible with both Windows and Mac operating systems.

Now that you know the features of this software. Let’s learn how to use it and trim MP4.
01. Import the video into Filmora
The first thing you should do is import the respective video into the Filmora interface. You should go to the ‘Import’ option and load the MP4 file from the computer to get this done.
If not, you can simply use the drag-and-drop method to get the files imported easily. After importing the file into the interface using either of those methods, drag and drop it on the timeline.

02. Trim the MP4 File You Have Imported
Trimming the MP4 file can be done using two methods based on your requirement.
To trim from the beginning or the ending of the video
Move the mouse pointer over either of the MP4 file’s timeline edges. Then, you will see a ‘double arrow’ appearing. Drag that arrow to match the length you need for the video.
Split MP4 file into multiple portions
You should play the MP4 video and drag the slider toward your desired location. Then, you should click on ‘Pause.’ Choose the ‘Split’ option.
Now, your video will be split into two. Repeat the same process to get the wanted part of your video. Then, you can delete the unwanted parts of it.
- If you have multiple MP4 clips to trim, you should handle them one by one.

Export the final product
After trimming is completed, you must click the ‘Create‘ button. This option will open the ‘Output‘ window. In this window, you can choose the output format as MP4 or any other format you prefer.
For instance, you can choose formats like WMV, VOB, FLV, MKV, WMV, etc. If you need to share the video on YouTube, Filmora allows you to do so.
In addition to that, it also allows you to burn MP4 videos into DVD and preserve them. The best thing is that all those options come with an easy-to-access approach for your convenience.
Once you are done with the process, you can simply click on ‘Create.’

Part 2: How to Trim MP4 Files using any Online Method
You may consider an online method if you don’t want to use installable software like Wondershare Filmora. This is called Wondershare Filmora Free Online Video Trimmer. With this option, you can edit videos without downloading anything on your computer.
Although it is an internet-dependent method, it still can do a decent job for you. You can upload the video from the computer or drag and drop the video link per this method.
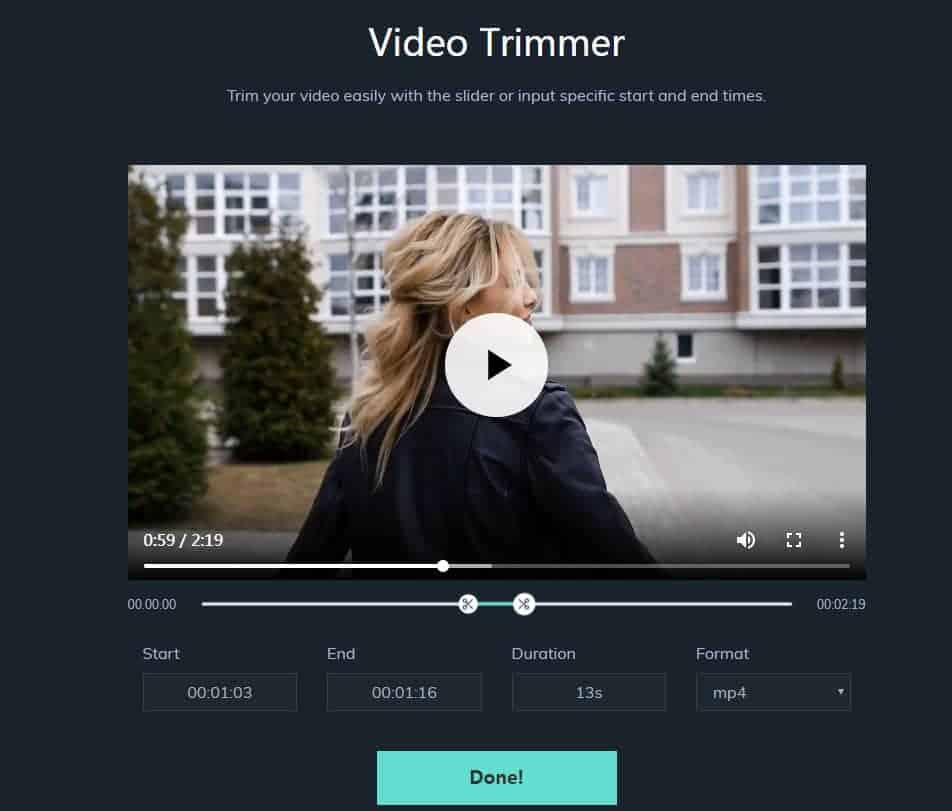
There are two specific methods to consider when trimming a video through this online method. You can either use the slider to define the duration or input specific start and end times. In addition to that, the online method we introduce is compatible with various file formats.
For instance, it works with MP4, MPEG, WEBM, FLV, MOV, etc. The best thing is that it doesn’t apply any watermarks to the output file. So, as we believe, it is worth trying this method.
01. Import the Video You Intend to Trim
You should visit the official website of this video trimmer as the first step. You can use this link to go to Filmora Free Online Video Trimmer. Then, you will see a clear interface that shows a large button to import the video.
You can click on that button and browse for the video you intend to trim. If not, you can enter the URL of your video to get the video imported.

02. Start Trimming the Video
With this method, you will be able to drag the slider and trim the specific part. If not, you can define the start and end of the video. You can choose whatever method suits your preference.
After getting the part specified, you should click on ‘Done,’ located towards the bottom of the screen. The default format of the video is MP4.
03. Download the Video
Now, you can download the video which you have trimmed. Once the video is downloaded, you will be able to share it on any social media platform you prefer.

Part 3: Trim MP4 Video using VLC
Most individuals treat VLC solely as a media player. However, it can also be used as a handy video editor. VLC is a decent editor specifically for minor edits you intend to do.
For instance, it can trim MP4 files easily without downloading any other software. Although the functionalities are limited compared to Filmora, VLC is a good option.
VLC comes with a simplified interface, and also it supports multiple platforms as well. The best thing about VLC is that it is entirely free. We explain how to trim MP4 videos using the VLC media player in the following steps.
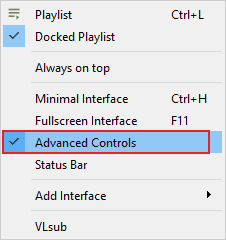
01. Go to ‘Advanced Controls’
First, you should launch the VLC player and import the respective video. Then, click on the ‘View‘ menu and select ‘Advanced Controls.’ As a result, you will see recording settings towards the bottom of the screen.
02. Trim the video
You will see a red circle, and pressing it will start the recording. Play the video at the same time. It should be done to the starting frame of the clip you intend to edit.
If required, you can record the video in frame-by-frame mode to be more precise. Once it gets to the ending frame, click on the red circle, so it ends the trimming process.

03. View the output
The output video (which is trimmed) can be found in C:\Users\Username\Videos. That’s it!
Other Tools and Software for Video Editing
To split, cut, and trim MP4 video clips, you’ll need reliable video editing software. Fortunately, there are several options available, ranging from beginner-friendly to professional-grade tools. Here are some popular choices:
- Adobe Premiere Pro: A professional video editing software with advanced features and comprehensive capabilities.
- Final Cut Pro: A powerful video editing software exclusive to Apple devices, known for its user-friendly interface and intuitive workflow.
- iMovie: A beginner-friendly video editing software for Mac users, offering a range of basic editing functions.
- DaVinci Resolve: A free video editing software that provides advanced editing tools and color correction features.
Best Practices for Video Editing
To optimize your video editing process and enhance the overall quality of your edited videos, consider the following best practices:
- Plan ahead: Before starting the editing process, outline the desired structure and flow of your video to streamline the editing process.
- Maintain visual consistency: Ensure that the visual elements, such as color grading and transitions, remain consistent throughout the video.
- Use appropriate transitions: Implement smooth transitions between segments to create a seamless viewing experience.
- Pay attention to audio: Edit the audio tracks carefully, removing background noise and adjusting volume levels as necessary.
- Experiment with effects: Enhance your video’s impact by incorporating visual effects, text overlays, and motion graphics.
By incorporating these best practices into your video editing workflow, you can create professional-looking videos that captivate and engage your audience.
FAQs
Q1: Can I split, cut, and trim MP4 video clips using free video editing software?
Yes, there are free video editing software options available, such as DaVinci Resolve and Filmora, which provide the necessary tools to split, cut, and trim MP4 video clips.
Q2: Will splitting, cutting, or trimming a video clip affect its quality?
No, splitting, cutting, or trimming a video clip does not affect its quality as long as the software used for editing maintains the original resolution and bitrate.
Q3: Can I undo the changes made during the splitting, cutting, or trimming process?
Yes, most video editing software allows you to undo and redo changes, giving you the flexibility to experiment and revert any unwanted modifications.
Q4: Is it possible to merge or combine split video clips back into a single video?
Yes, you can merge or combine split video clips using video editing software. The software allows you to arrange the segments in the desired order and export them as a single video file.
Q5: Can I edit other video formats apart from MP4?
Yes, most video editing software supports a wide range of video formats, including MP4, MOV, AVI, and more. You can edit videos in various formats based on your requirements.
Conclusion
Mastering the art of splitting, cutting, and trimming MP4 video clips empowers you to create visually appealing and impactful videos. By utilizing the right tools, understanding the editing process, and following best practices, you can transform raw video footage into polished and engaging content.
Remember to plan ahead, maintain visual consistency, and experiment with effects to elevate the quality of your videos. With these skills and knowledge, you can confidently edit MP4 video clips and unleash your creativity.
Nevertheless, Wondershare Filmora will give you various other editing options instead of just trimming a video.


