
Under usual circumstances, getting rid of the deleted files in your Mac should be a piece of the cake. But, in certain cases, things will not go your way, even with such an easy task.
In other words, there are times in which you will have to struggle to empty your Mac’s trash. Search engines have received a few queries related to such issues in the past. In that case, you will have to force empty trash on Mac.
As a general practice, users tend to delete files that aren’t any longer needed. When these files are dragged and dropped into the trash, they don’t exist in the original location. In fact, things might be OK as long as a couple of lightweight items are in the trash.
However, when trash items gather in large numbers, it can be problematic for two main reasons. First, the deleted files require space to be saved on the hard disk. As time goes on, it can consume a significant amount of space.
The second reason is that these trash files can leave massive loads of junk files on the computer. As a result, you will experience a considerable performance loss on your computer.
So, things will become so frustrating when you don’t get the expected performance from your Mac. Therefore, getting rid of the trash files regularly is exceptionally important.
Reasons Why You Cannot Empty Trash on the Mac?
Many individuals expect everything to happen smoothly when it comes to emptying trash files on Mac. In most cases, it is simple.
In fact, it’s a matter of selecting the trash icon on the dock and choosing the Empty Trash option. If not, you can use Command, Shift, and Delete keys to delete the trash items.

However, things will not go your way all the time. There are times that things with your Mac may go wrong. Occasionally, you might notice that some junk files become a problem as they become undeletable. The reasons for trash files becoming undeletable are mentioned below.
- If you try to delete a file that is currently in use or opened by an app
- If the respective file is used by an app that runs in the background.
- Or if the name of the file you intend to delete has special characters
- If the file is considered to be too important to be deleted by the system
- If the file is corrupted and requires to be repaired
- Or if the respective file is under system protection integrity
- If the file you intend to delete is locked. In this case, you will see a lock icon towards the bottom-left corner of the respective icon. Then, you will have to right-click on the respective file and select the option ‘Get Info.’ If the respective file is marked as locked, you should deselect the same.
How to Perform a Force Empty Trash on Mac Through Its Terminal?
Now, let’s learn how to force empty trash on Mac in a very effective way. You can use this option if you cannot get rid of the items in the trash. In this case, we will be using the terminal, so you don’t need to download any third-party app.
If you are using Mac OS X, you can use the command sudo rm -rf ~/.Trash/ to do this. In that OS, the respective code will force empty trash on Mac without any issue. However, if you are using Mac El Capitan, Sierra, or a newer version of Mac, the process is a bit different.
You Can Follow the Steps Mentioned Below with Mac’s Terminal and Force Empty the Trash for Good.
- 01. First of all, you should go to ‘Applications.’ If not, you can use the spotlight feature to open ‘Terminal.’

- 02. Now that the terminal is opened, you should insert the command as mentioned below.
‘sudo rm –R‘
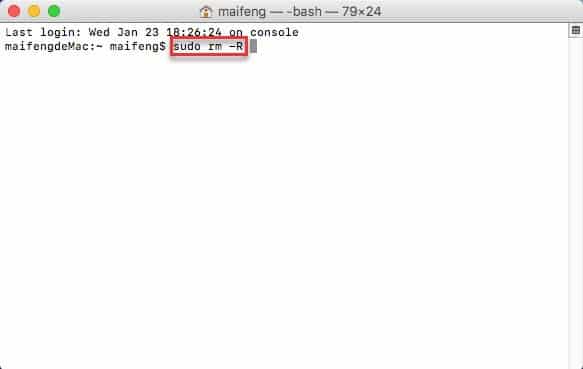
- Please make sure that there is a space after R, and you must avoid inverted commas. Then, make sure that you hit the ‘Enter‘ key.
- 03. Now, click on the Trash icon located in the dock. Then, you should pick all the items that are required to be deleted completely from your Mac’s Trash. Then, ensure that the files and folders are dragged to the Terminal window, which is already opened.
- 04. Hit the ‘Enter‘ key to proceed to the next step.
- 05. You will have to enter the Administrator password at this stage. However, the password you enter will not be displayed when you type it in the terminal.
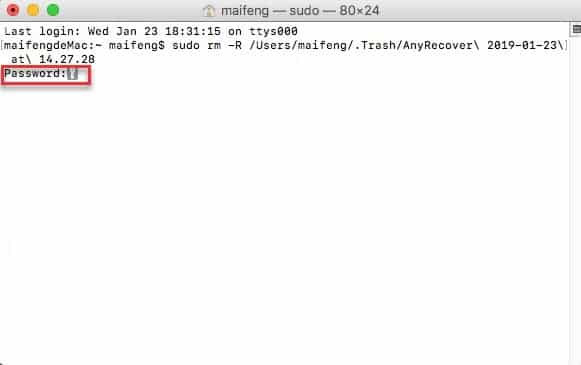
- 06. After correctly entering the password, hit the ‘Enter‘ button again. This should complete the process.

- Please note that the time it takes to complete the process will vary depending on the number of files. That means the more the number of files, the longer it will take to empty the trash. So, be patient and wait for the results.
Beside, learn more about how to delete downloads on Mac.
How to Get Back the Files I Have Lost During Force Empty Trash on Mac?
There are times you will regret emptying trash. For instance, what if you have accidentally deleted a file that is absolutely necessary? Is that it? Are those files gone forever? Not necessarily. Have you made a blunder in deleting the files in the trash and need to get back those files?
The good news is that it’s possible to get those files back no matter how lost. Even if you’ve intentionally deleted the files or happened due to a malware attack, you can recover them.
The requirement, in this case, is that you will have to use a third-party tool to recover these files. Although there’re plenty of third-party tools to get it done, we strongly suggest you do good research beforehand. We have done lengthy research on this topic and ended up with a potent tool. It is called Tenorshare 4DDiG (Mac).
Thanks to 4DDiG’s highly user-friendly interface and data recovery modes, you can recover data faster than you think. To recover data, you don’t need to be an expert programmer. Instead, all you need is to follow the simple instructions provided. If you follow the instructions properly, you can retrieve all lost files from the trash.
Another benefit of 4DDiG is that it supports all your storage devices. For instance, it can recover data from external hard drives, SD cards, USB flash drives, etc. In addition, it can recover all the common types of files you use.
This tool can recover documents, images, videos, audio, and many other files. So, if you have lost files due to forcing empty trash on Mac, 4DDiG is the best option.
Reasons to use Tenorshare 4DDiG
Here are the reasons for you to rely on 4DDiG.
- 4DDiG doesn’t require you to possess advanced knowledge in handling it because it is highly user-friendly.
- It is compatible with more than 1000 file types.
- This software is capable of recovering deleted files from all storage devices. For instance, this software can recover data from internal and external storage devices.
- It allows you to preview the files before recovering them, making the process more accurate.
- 4DDiG can recover data even from virtual disks, which explains this tool’s power.
How to use 4DDiG to Retrieve the Files You Have Lost on Mac
You may follow the below steps to get your lost files back on the hard drive.
Step 1. Download and install 4DDiG, and then please select a location to recover your lost data on Mac. Here, check Trash and tap the Scan button to proceed.

Step 2. 4DDiG starts to scan your files deleted from Trash. And you will have a clear view of all those files.

Step 3. Please click on the “Recover” button to recover the files on your Mac’s hard drive now.

Conclusion
Emptying the trash on your Mac should be a straightforward process, but occasionally, you might encounter challenges.
This article has provided you with various methods to force empty the trash, including quitting applications, using Terminal, restarting your Mac, and utilizing third-party applications. By following these steps and best practices, you can ensure that your trash is emptied successfully, freeing up valuable disk space on your Mac.
Frequently Asked Questions
Q1: Can I recover files after force emptying the trash?
A1: No, force emptying the trash permanently deletes the files, and they cannot be recovered easily. Make sure to double-check the contents of the trash before proceeding.
Q2: Will force emptying the trash affect other files on my Mac?
A2: Force emptying the trash only deletes the files in the trash. It does not affect other files or applications on your Mac.
Q3: Why am I still unable to empty the trash after force emptying it?
A3: If you are still facing issues after force emptying the trash, there might be underlying system issues or file corruption. Consider seeking technical assistance to resolve the problem.
Q4: Are third-party applications safe to use for force emptying the trash?
A4: It is essential to exercise caution when using third-party applications. Ensure you download them from reputable sources and read user reviews before proceeding.
Q5: Can I use the force empty trash method for individual files instead of emptying the entire trash?
A5: Yes, you can use the force empty trash method for individual files. Simply select the specific file(s) you want to delete from the trash and follow the steps mentioned in this article.


